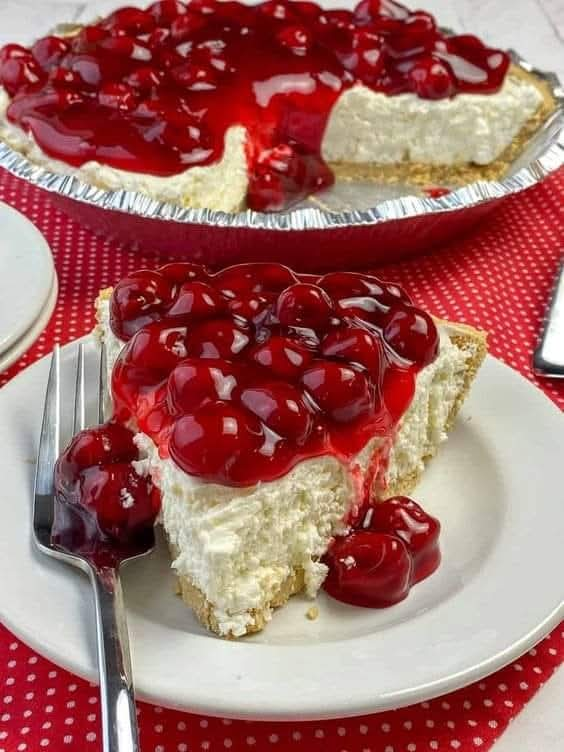
Imagine the scene: it’s the peak of summer, or a holiday gathering is moments away. The oven is already overloaded, the kitchen is warm, but the dessert table demands a showstopper. Enter the hero: a No-Bake Cherry Cheesecake. This isn’t just a recipe; it’s a lifesaver. With a buttery, crunchy graham cracker crust, a cloud-like, perfectly tangy and sweet cream cheese filling, and that iconic glossy ruby-red cherry topping, it’s the easy no-bake dessert that promises (and delivers) pure nostalgia with zero stress. This is the perfect make-ahead dessert for busy hosts, a foolproof beginner dessert for new bakers, and a guaranteed crowd-pleasing potluck dish that will have everyone asking for the recipe.
The magic of a no-bake cheesecake lies in its elegant simplicity and forgiving nature. Without the worry of water baths, cracking tops, or over-baking, this recipe empowers anyone to create a stunning, professional-looking dessert. It’s a cool summer dessert that requires no oven, a quick last-minute dessert that sets in a few hours, and the answer to the eternal question: “What can I bring that will wow everyone?” Let’s dive into creating this timeless classic, with all the secrets to ensure your version is nothing short of perfect.
Why This No-Bake Cherry Cheesecake Recipe Is Unbeatable
This recipe is engineered for success and maximum flavor. Unlike baked versions, the filling here is airy, light, and melts on the tongue. The combination of cream cheese, whipped cream, and a precise touch of structure from powdered sugar and lemon juice creates a texture that is luxuriously creamy yet sliceable. We bypass the traditional sour cream for a lighter feel, and the method ensures no dreaded “graininess” from under-whipped cream cheese. It’s a family-friendly dessert that kids adore, an impressive holiday dessert (think 4th of July or Christmas!), and the ultimate comfort food sweet treat. Best of all, its success relies on technique, not chance, making it the most reliable dessert recipe in your repertoire.
No-Bake Cherry Cheesecake: Ingredients & The Art of the Swap
Here’s your roadmap to dessert heaven. Every component is simple, but each choice matters.
For the Graham Cracker Crust:
· 2 cups (about 200g) graham cracker crumbs (from 14-16 full sheets)
· ½ cup (113g) unsalted butter, melted
· ¼ cup (50g) granulated sugar
· Pinch of salt
For the Cream Cheese Filling:
· 24 oz (three 8-oz blocks) full-fat cream cheese, softened to room temperature
· 1 ¼ cups (150g) powdered sugar, sifted
· 1 tablespoon pure vanilla extract
· 1 tablespoon fresh lemon juice
· Pinch of salt
· 2 cups (480ml) heavy cream or heavy whipping cream, cold
For the Cherry Topping:
· 2 cans (21 oz each) cherry pie filling (the classic choice)
· OR for a homemade option: 4 cups fresh/frozen pitted cherries, ½ cup sugar, ¼ cup water, 1 tbsp lemon juice, and 2 tbsp cornstarch mixed with 2 tbsp water.
Ingredient Deep Dive: Choosing Your Champions
The Crust: Graham crackers are the classic for a reason—their honey-kissed, slightly spiced flavor is iconic. For a gluten-free cheesecake, use gluten-free graham-style crackers. For a different twist, try Biscoff cookie crumbs or digestive biscuits. The melted butter is the binder; use unsalted to control the salt level. The sugar adds sweetness and helps the crust crisp.
The Cream Cheese: FULL-FAT, BLOCK cream cheese is non-negotiable. Do not use spreadable, low-fat, or whipped cream cheese from a tub. They contain stabilizers and different moisture contents that will prevent your filling from setting properly. Softening to room temperature (about 2 hours out of the fridge) is the single most critical step for a smooth, lump-free filling.
The Sweetener: Powdered (confectioners’) sugar is used here instead of granulated for two reasons: it dissolves instantly into the cream cheese, preventing graininess, and its small amount of cornstarch contributes gently to the filling’s stability.
The Cream: Heavy cream or heavy whipping cream (with 36%+ milkfat) is essential. It must be ice-cold to whip up into stiff, stable peaks that hold the filling’s structure. Do not substitute with half-and-half, milk, or Cool Whip for the filling.
The Flavor Enhancers: Vanilla extract and lemon juice are the secret weapons. The vanilla provides warmth, while the small amount of lemon juice doesn’t make it taste lemony; it brightens the flavor, cutting through the richness and making the cream cheese taste more like itself.
The Topping: A quality canned cherry pie filling is convenient, nostalgic, and delicious. For a from-scratch cherry topping with more vibrant, less sweet flavor, the homemade option is fantastic and allows you to control the sweetness and thickness.
Essential Tools for No-Bake Success
A 9-inch Springform Pan: The removable sides are crucial for a clean presentation. Lining the bottom with a parchment round prevents sticking.
Electric Mixer (Stand or Handheld): A must for whipping the cream and beating the cream cheese until perfectly smooth.
Food Processor or Ziploc Bag & Rolling Pin: For making fine, even graham cracker crumbs.
Rubber Spatula: For folding the whipped cream gently into the filling, preserving the air you’ve whipped in.
Measuring Cups & Spoons: Accuracy ensures the perfect set.
Chilled Mixing Bowl: Pop your metal or glass mixing bowl for the cream in the freezer for 10 minutes before whipping. Cold tools = better whip.
Step-by-Step Instructions: Foolproof Layers of Delight
Step 1: Build the Foundation (The Crust)
If using whole crackers, pulse them in a food processor until you have fine, even crumbs. Combine crumbs, sugar, and salt in a medium bowl.
Pour the melted butter over the crumbs and mix with a fork until the mixture resembles wet sand and holds together when pinched.
Press the mixture firmly and evenly into the bottom and about 1 inch up the sides of your prepared springform pan. Use the bottom of a flat glass or measuring cup to compact it—this prevents a crumbly crust.
Place the crust in the freezer to set firmly while you make the filling, about 15-20 minutes.
Pro Tip: Freezing, rather than just chilling, the crust ensures it won’t get soggy when the filling is added and will provide the sturdiest base for slicing.
Step 2: Create the Cloud-Like Filling (The Most Important Step)
Whip the Cream: In your chilled bowl, using your mixer’s whisk attachment, whip the cold heavy cream on medium-high speed until stiff peaks form. This means when you lift the whisk, the peak stands straight up and doesn’t flop over. Be careful not to over-whip into butter. Transfer this to a separate bowl and set aside.
Beat the Cream Cheese: In the same mixing bowl (no need to wash), beat the softened cream cheese on medium speed for 1-2 minutes until completely smooth, creamy, and free of any lumps. Scrape down the bowl.
Add Flavors: With the mixer on low, add the sifted powdered sugar, vanilla, lemon juice, and salt. Mix until just combined and smooth. Scrape down the bowl again.
The Gentle Fold: Now, using your rubber spatula, add about one-third of the whipped cream to the cream cheese mixture. Fold gently but thoroughly to lighten the very dense cream cheese. This initial mix makes it easier to incorporate the rest without deflating it.
Incorporate Remaining Cream: Add the remaining two-thirds of the whipped cream. Now, fold with a gentle, sweeping motion—down the center, up the side, and turn the bowl—until no white streaks remain. The mixture should be uniform, thick, and fluffy.
Pro Tip: Do not use the mixer for this step. Folding by hand is the only way to keep the filling light and airy.
Step 3: Assemble and Set
Retrieve your crust from the freezer. Spoon the fluffy filling into the crust.
Smooth the top with an offset spatula or the back of a spoon, creating a beautiful, even surface.
Cover the pan loosely with plastic wrap (use toothpicks to keep it from touching the top) and refrigerate for at least 6 hours, but ideally overnight. This patient chilling is non-negotiable for the cheesecake to firm up properly for clean slicing.
Step 4: The Grand Finale (The Topping)
Just before serving, run a thin knife around the inner edge of the springform pan to loosen. Release the clasp and carefully remove the ring.
If using canned pie filling, simply spoon it over the entire top of the chilled cheesecake, spreading to the edges. For the homemade topping (see instructions below), let it cool completely before spreading.
Slice with a sharp, thin knife dipped in hot water and wiped clean between each cut for pristine pieces.
For Homemade Cherry Topping: In a saucepan, combine cherries, sugar, water, and lemon juice. Cook over medium heat for 5-8 minutes until cherries soften and release juices. Whisk the cornstarch slurry and slowly stir into the bubbling cherries. Cook for 1-2 more minutes until thickened and glossy. Remove from heat and cool completely.
The Food Science: Why No-Bake Cheesecake Sets
Understanding the “how” prevents the “why didn’t this work?” The structure comes from three key factors:
Fat Crystallization: The heavy whipping cream, when whipped, traps tiny air bubbles within a network of solidified milkfat globules. This creates a semi-solid, stable foam. When chilled, these fat crystals firm up further, providing the primary structure.
Cream Cheese Stability: Full-fat cream cheese contains its own stabilizers and a dense, thick texture that, when aerated by the whipped cream, holds its shape beautifully when cold.
The Power of Cold: Refrigeration is the final setting agent. It causes the fats in both the cream cheese and whipped cream to solidify completely, transforming the fluffy mixture into a sliceable, yet tender, masterpiece. The powdered sugar’s cornstarch also absorbs minimal excess moisture, aiding in a clean set.
Serving, Presentation & Pairing Ideas
This cheesecake is a star on its own but can be elevated for any occasion.
· Presentation: Serve on a cake stand. For a diner-style look, add the cherry topping only to individual slices just before serving, letting the red cascade down the white sides. Garnish with fresh mint or a light dusting of powdered sugar.
· Perfect Pairings: Serve with a cup of strong coffee, a glass of cold milk, or a dessert wine like Moscato d’Asti. For a summer BBQ, it’s the perfect refreshing dessert after grilled meats.
· Variation – Chocolate Lovers: Add ½ cup of sifted cocoa powder to the crust or fold ½ cup of mini chocolate chips into the filling for a chocolate-cherry delight.
Storage, Make-Ahead & Freezing Guide
· Make-Ahead Magic: This is the ultimate make-ahead dessert. It can be made, topped, and stored in the fridge for up to 3 days. The flavor actually improves!
· Storage: Keep covered in the refrigerator for 4-5 days.
· Freezing: You can freeze the un-topped cheesecake remarkably well. Wrap the chilled, set cheesecake (without cherries) tightly in plastic wrap, then in foil. Freeze for up to 2 months. Thaw overnight in the fridge before adding topping and serving.
Dietary Customizations & Troubleshooting FAQ
Why is my filling runny/not setting?
Cream cheese wasn’t full-fat or was too cold.
Cream wasn’t whipped to stiff peaks.
It wasn’t chilled long enough. Give it the full 6+ hours.
Can I make this gluten-free?
Yes!Use certified gluten-free graham-style crackers for the crust. Ensure all other ingredients (like powdered sugar) are GF.
Can I make this lower sugar?
You can reduce powdered sugar in the filling slightly,but it may affect texture. Use a sugar-free pie filling or a homemade topping with a sugar substitute designed for baking.
My crust is too crumbly!
You likely didn’t press it firmly enough or use enough butter.Ensure the mixture holds together when pinched before pressing.
Can I use a different pan?
A 9×13-inch dish works for a“cheesecake bar” style. Double the crust recipe and press into the bottom only. Slice into squares.
How do I get the perfect clean slice?
Use a sharp,thin-bladed knife. Dip it in very hot water, wipe it dry, make your cut, and repeat for each slice.
Conclusion: More Than Just a Dessert
This No-Bake Cherry Cheesecake is a portal to joy. It’s the simplicity that empowers, the nostalgia that comforts, and the dazzling result that impresses. It proves that you don’t need complex techniques or a professional kitchen to create something extraordinary. It’s a dessert that says “I care enough to make it homemade,” without the stress that usually implies.
So, soften that cream cheese, whip that cream, and embrace the chill. Your reward is a slice of creamy, cherry-topped perfection and the confidence that you’ve mastered a classic.
Did you make this legendary cheesecake? Share your masterpiece with us! Tag your photos #NoBakeCherryCheesecake on Instagram. We love seeing your creations! For more easy, show-stopping desserts, subscribe to our newsletter below.
Printable Recipe Card: No-Bake Cherry Cheesecake
Prep Time: 25 mins | Chill Time: 6+ hours | Total Time: 6 hours 25 mins | Servings: 12
Ingredients:
Crust:
· 2 cups graham cracker crumbs
· ½ cup melted unsalted butter
· ¼ cup granulated sugar
Filling:
· 24 oz full-fat cream cheese, softened
· 1 ¼ cups powdered sugar, sifted
· 1 tbsp vanilla extract
· 1 tbsp lemon juice
· Pinch of salt
· 2 cups heavy cream, cold
Topping:
· 2 cans (21 oz each) cherry pie filling
Instructions:
- Crust: Mix crumbs, sugar, and melted butter. Press firmly into bottom and up sides of a 9-inch springform pan. Freeze 15 mins.
- Filling: Whip cold cream to stiff peaks; set aside. Beat softened cream cheese until smooth. Mix in powdered sugar, vanilla, lemon juice, and salt until combined.
- Gently fold whipped cream into cream cheese mixture until no streaks remain.
- Spoon filling into frozen crust, smooth top. Cover and chill for at least 6 hours, preferably overnight.
- Serve: Run knife around edge, release pan ring. Top with cherry pie filling. Slice with a hot, clean knife.
More Recipes You Might Like
-

Cheesy Potato Patties 😋 – Crispy, Golden, and Irresistibly Cheesy If you’re looking for a high-RPM comfort food recipe that gets clicks, saves, and repeat cooks, Cheesy Potato Patties are a guaranteed winner. Crispy on the outside, soft and fluffy on the inside, and loaded with melty cheese—this recipe checks every box readers love: easy…
-

Brown Sugar Pineapple Ham Bake 😋 – The Ultimate Sweet & Savory Comfort Dish If you’re searching for a high-RPM, comfort-food recipe that people love clicking, saving, and cooking again and again, this Brown Sugar Pineapple Ham Bake is it. Sweet, sticky brown sugar. Juicy pineapple. Tender, savory ham. Baked together into one irresistible dish…
-

Angel Chicken Pasta – The Creamy Comfort Food That Everyone Loves
Few dishes feel as comforting, indulgent, and crowd-pleasing as Angel Chicken Pasta. This creamy, slow-cooked chicken pasta recipe has earned its name because it’s truly heavenly—rich, velvety sauce, tender chicken, and perfectly cooked pasta all coming together in one unforgettable meal. Angel Chicken Pasta is one of those recipes that never goes out of style.…