Imagine a dessert that feels like a cloud wearing a velvet robe. A treat where a crisp, buttery base gives way to a layer of impossibly smooth, rich vanilla custard, all crowned with a billowy pillow of fresh whipped cream. This is the magic of Vanilla Custard Cream Squares—a classic no-bake dessert that masters the art of elegance through simplicity. If you’re searching for a show-stopping potluck dessert that whispers sophistication rather than shouting for attention, a make-ahead marvel for easy entertaining, or simply a creamy, comforting dessert that feels like a hug on a plate, you have arrived at the right recipe.
This isn’t just another layered bar. It’s a masterclass in texture and balance. The beauty lies in its layers: the sturdy, crunchy foundation, the decadent and smooth custard heart, and the light, airy finish. It’s a retro dessert recipe that has stood the test of time because it is universally adored—by kids for its sweet creaminess and by adults for its refined, nostalgic flavor. Best of all, it requires zero oven time, making it the perfect summer dessert or a lifesaver during hectic holidays. Let’s create a dessert that’s as beautiful to look at as it is sublime to eat.
Why Vanilla Custard Cream Squares Deserve a Spot in Your Recipe Box
This dessert is the epitome of “more than the sum of its parts.” Its virtues are numerous for both the beginner and seasoned host.
· The Ultimate No-Bake Convenience: No oven, no water baths, no baking anxiety. It’s all stovetop and fridge, making it a foolproof dessert recipe for any skill level.
· Make-Ahead Perfection: It must chill for hours, meaning you can (and should!) prepare it a full day ahead. It’s the perfect dessert for entertaining that actually reduces day-of stress.
· Crowd-Pleasing Elegance: Its clean, layered appearance in a glass dish is instantly inviting. The familiar, beloved flavors of vanilla and cream make it a guaranteed crowd-pleaser at any gathering.
· Texture Symphony: The contrasting layers of crunchy crust, ultra-smooth custard, and light whipped cream create a sensory experience in every bite.
· Endlessly Adaptable: Master this classic vanilla version, and you unlock a world of variations—chocolate, lemon, berry swirl, or tropical coconut.
The Science of Smooth: Deconstructing the Three Perfect Layers
Each layer in this dessert has a specific, crucial role. Understanding the ingredients ensures flawless execution.
Layer 1: The Graham Cracker Crust – The Essential Foundation
This crust needs to be sturdy enough to support the heavy custard but delicious enough to stand on its own.
· Graham Cracker Crumbs: The classic choice for its sweet, slightly honeyed flavor that pairs perfectly with vanilla. Digestive biscuits or vanilla wafers make excellent alternatives.
· Granulated Sugar: A bit of sugar caramelizes slightly with the butter, helping the crust hold together and adding sweetness.
· Unsalted Butter, Melted: The binder. Using unsalted butter lets you control the salt level. The butter must be fully melted to coat every crumb. Pro Tip: For a deeper, nuttier flavor, use browned butter. Cook the butter until golden brown, then let it cool slightly before mixing.
Layer 2: The Vanilla Custard – The Luxurious Heart
This is where pastry cream meets the simplicity of a no-bake dessert. The goal is a set, sliceable, intensely vanilla filling.
· Instant Vanilla Pudding Mix (Two 3.4 oz boxes): This is the modern shortcut that guarantees perfect consistency and sets without eggs. It provides the ideal structure and that familiar, comforting flavor. For a more from-scratch taste, you can use a cooked pastry cream, but the simplicity here is key.
· Whole Milk & Heavy Cream: The liquid base. Using a combination of whole milk and heavy cream (or half-and-half) is the secret to a rich, luxurious custard that’s far superior to using milk alone. The fat in the cream provides incredible mouthfeel.
· Cream Cheese (8 oz, softened): The secret ingredient for perfection. It adds a subtle tang that balances the sweetness, provides an incredibly smooth and dense texture, and helps the custard layer set firmly enough to cut clean squares.
· Pure Vanilla Extract & Bean Paste: Vanilla is the star. Use the highest quality pure vanilla extract you can. For those beautiful black specks and an even deeper flavor, add a teaspoon of vanilla bean paste.
Layer 3: The Whipped Cream Topping – The Light-as-Air Finish
This final layer adds visual height, a light texture, and a not-too-sweet finish.
· Heavy Whipping Cream (2 cups): Must be cold, very cold. Chilling your bowl and beaters helps it whip faster and higher.
· Powdered Sugar & Vanilla: A little powdered sugar sweetens and stabilizes the cream slightly. Another dash of vanilla ties all the layers together.
Step-by-Step Guide to Flawless, Sliceable Squares
The method is straightforward, but precision in each step ensures clean layers and perfect texture.
Phase 1: The Crust – Press, Don’t Pour
Combine & Press: In a medium bowl, mix graham cracker crumbs, sugar, and melted butter until it resembles wet sand. Pour into an ungreased 9×13-inch baking dish. The Key Technique: Use the bottom of a flat glass or measuring cup to press the mixture firmly and evenly into the bottom of the pan. This compacting is what prevents a crumbly, messy crust.
Chill: Place the crust in the refrigerator for at least 15-20 minutes to set. This step is crucial for a solid base.
Phase 2: The Custard – Whip It Smooth
Beat the Cream Cheese: In a large bowl, beat the softened cream cheese with an electric mixer on medium-high speed for 1-2 minutes until completely smooth and lump-free. Scrape down the bowl.
Create the Pudding Base: In a separate large bowl, whisk the instant pudding mixes with the milk and heavy cream. Whisk vigorously for a full 2 minutes until it is very thick and smooth. It will thicken almost instantly.
Combine: Add the thick pudding mixture to the beaten cream cheese. Beat on medium speed until the two are completely combined and silky smooth, scraping the bowl as needed. This may take 1-2 minutes. Beat in the vanilla extract (and paste if using).
Phase 3: Assembly & The First Chill
Layer the Custard: Remove the chilled crust from the fridge. Pour the custard mixture over the crust and spread it into a perfectly smooth, even layer using an offset spatula.
Chill to Set: Cover the dish tightly with plastic wrap. Refrigerate for at least 3-4 hours, or until the custard layer is completely firm. Overnight is ideal.
Phase 4: The Topping & Final Presentation
Whip the Cream: Just before serving, prepare the topping. In a chilled bowl, beat the cold heavy cream, powdered sugar, and vanilla on medium-high speed until stiff peaks form.
Spread and Decorate: Spread the whipped cream evenly over the set custard layer. For a beautiful finish, you can pipe rosettes or simple dollops around the edges.
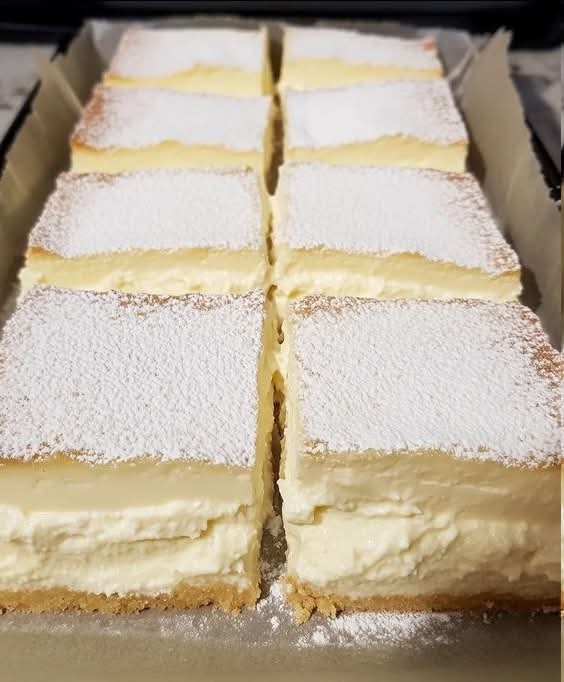
Slice and Serve: For the cleanest cuts, dip a sharp knife in hot water and wipe it dry between each slice. Garnish with a light dusting of graham cracker crumbs, chocolate shavings, or a single fresh berry on each square.
Serving Suggestions & Elegant Variations
This dessert is stunning on its own, but it can be dressed up for any occasion.
· Classic Presentation: Serve simple squares in a dessert dish, perhaps with a fresh strawberry or mint sprig on the side.
· Berry Coulis: Drizzle a plate with a vibrant raspberry or strawberry coulis before placing the square on top for a restaurant-worthy presentation.
· Chocolate Drizzle: Melt semi-sweet chocolate with a touch of cream and drizzle artfully over the whipped cream topping before serving.
· Flavor Variations:
· Chocolate Custard Squares: Use chocolate instant pudding and add a tablespoon of cocoa powder to the crust.
· Lemon Delight: Use lemon instant pudding and add 2 tablespoons of lemon zest to the custard layer. Top with lemon curd swirls.
· Tropical Twist: Add 1 cup of toasted coconut to the crust and use coconut cream in place of some of the milk in the custard.
Storage & Make-Ahead Instructions
This dessert’s make-ahead nature is its superpower, but proper storage keeps it perfect.
· Refrigeration (Without Topping): The crust and custard layers, covered tightly, can be refrigerated for up to 2 days before adding the whipped cream.
· Full Dessert (With Topping): Once topped with whipped cream, it’s best enjoyed within 24 hours, as the whipped cream may begin to weep or soften. Keep covered in the fridge.
· Freezing: It is not recommended to freeze the assembled dessert, as the custard and whipped cream layers will not thaw with the original texture. However, the crust base can be frozen separately.
Frequently Asked Questions (FAQ)
Q: Can I use cool whip instead of homemade whipped cream?
A:Yes, for convenience and stability, you can fold an 8 oz tub of thawed cool whip into the custard mixture instead of the milk/cream pudding step, and/or use it for the topping. The texture will be lighter and slightly less rich.
Q: My custard layer didn’t set firm enough to slice cleanly. What happened?
A:The most common reasons are: 1) Not beating the pudding mixture for the full 2 minutes to activate the thickeners, 2) Using low-fat milk or cream, or 3) Not chilling it for long enough. Ensure you use full-fat dairy and chill thoroughly, preferably overnight.
Q: Can I make this in individual portions?
A: Absolutely!This is a fantastic easy dessert for parties. Layer the crust, custard, and cream in clear plastic cups or small mason jars. They look beautiful and are effortlessly portable.
Q: Is there a way to make this without pudding mix?
A:Yes, you can make a traditional pastry cream (with eggs, cornstarch, and milk/cream cooked on the stovetop), then beat in the softened cream cheese once it has cooled. This method is more labor-intensive but yields a superb from-scratch flavor.
Q: My crust is sticking to the pan. How do I prevent that?
A:While you don’t grease the pan (as the butter in the crust helps it release), ensure you are pressing it firmly. Letting the squares sit at room temperature for 5-10 minutes before cutting can also help. Using a metal spatula to lift them out is recommended.
Conclusion: A Timeless Treat of Pure Comfort
Vanilla Custard Cream Squares are a testament to the elegant power of simplicity. They prove that you don’t need complex techniques or exotic ingredients to create a dessert that feels special, tastes divine, and brings people together. It’s a recipe that builds confidence in the kitchen and creates lasting memories at the table.
I would love to see your beautiful creation! Did you try a flavor variation? Master the perfect slice? Share a photo of your gorgeous squares and tag it #MyCustardCreamDream. And when you’re ready for another no-bake classic, you must try my Heavenly Banana Pudding Trifle—it’s a soul-satisfying crowd-pleaser that’s always a hit!
Vanilla Custard Cream Squares
Prep Time: 30 mins | Chill Time: 4+ hours | Total Time: 4 hours 30 mins | Servings: 12-15 squares
Course: Dessert | Cuisine: American
Keywords: vanilla custard cream squares, no bake dessert, easy pudding dessert, make ahead dessert, potluck dessert, creamy vanilla dessert, retro dessert recipe, summer desserts, crowd pleasing dessert, holiday dessert, sliceable custard, graham cracker crust
Description: The ultimate no-bake layered dessert! A buttery graham cracker crust, a rich and smooth vanilla custard cream cheese layer, and fresh whipped cream come together in these irresistible, sliceable squares.
Ingredients:
For the Crust:
· 2 cups (200g) graham cracker crumbs (about 14 full sheets)
· ⅓ cup (65g) granulated sugar
· ½ cup (113g / 1 stick) unsalted butter, melted
For the Custard Layer:
· 1 package (8 oz) full-fat cream cheese, softened to room temperature
· 2 packages (3.4 oz each) instant vanilla pudding mix
· 2 cups (480ml) cold whole milk
· 1 cup (240ml) cold heavy whipping cream
· 1 teaspoon pure vanilla extract
· 1 teaspoon vanilla bean paste (optional, for specks)
For the Topping:
· 2 cups (480ml) cold heavy whipping cream
· ¼ cup (30g) powdered sugar
· 1 teaspoon pure vanilla extract
Instructions:
Make Crust: Mix graham cracker crumbs, sugar, and melted butter. Press firmly and evenly into the bottom of an ungreased 9×13-inch pan. Refrigerate for 20 mins.
Make Custard: Beat softened cream cheese until smooth. In a separate large bowl, whisk pudding mixes, cold milk, and 1 cup heavy cream for 2 full minutes until very thick. Add pudding mixture to cream cheese and beat until completely smooth and combined. Beat in vanilla extract and paste.
Assemble: Spread custard mixture evenly over the chilled crust. Cover and refrigerate for at least 4 hours, or overnight, until completely set.
Add Topping: Before serving, beat 2 cups cold heavy cream, powdered sugar, and 1 tsp vanilla until stiff peaks form. Spread over set custard layer.
Serve: Dip a sharp knife in hot water and wipe dry for clean cuts. Slice into squares and serve chilled.
Notes:
· Chill Time is Key: Do not skip the long chill for the custard layer; it is essential for clean slicing.
· Full-Fat Dairy: For the best texture and stability, use full-fat cream cheese, whole milk, and heavy cream.
· Make-Ahead: The crust and custard can be made up to 2 days ahead. Add whipped cream topping within a few hours of serving.
· Clean Slices: For picture-perfect squares, chill the entire dessert again for 30 minutes after adding the whipped cream before cutting.
More Recipes You Might Like
-

Cheesy Potato Patties 😋 – Crispy, Golden, and Irresistibly Cheesy If you’re looking for a high-RPM comfort food recipe that gets clicks, saves, and repeat cooks, Cheesy Potato Patties are a guaranteed winner. Crispy on the outside, soft and fluffy on the inside, and loaded with melty cheese—this recipe checks every box readers love: easy…
-

Brown Sugar Pineapple Ham Bake 😋 – The Ultimate Sweet & Savory Comfort Dish If you’re searching for a high-RPM, comfort-food recipe that people love clicking, saving, and cooking again and again, this Brown Sugar Pineapple Ham Bake is it. Sweet, sticky brown sugar. Juicy pineapple. Tender, savory ham. Baked together into one irresistible dish…
-

Angel Chicken Pasta – The Creamy Comfort Food That Everyone Loves
Few dishes feel as comforting, indulgent, and crowd-pleasing as Angel Chicken Pasta. This creamy, slow-cooked chicken pasta recipe has earned its name because it’s truly heavenly—rich, velvety sauce, tender chicken, and perfectly cooked pasta all coming together in one unforgettable meal. Angel Chicken Pasta is one of those recipes that never goes out of style.…