Imagine this: a hot summer day, a craving for something sweet and creamy hits, but the very thought of turning on the oven feels unbearable. Or perhaps you need a last-minute dessert that will stun a crowd without stressing you out. Enter the hero you didn’t know you needed—a luscious, no-bake pineapple slice made with just three magical ingredients: canned pineapple, condensed milk, and cream cheese.
This isn’t just a simple mix; it’s a revelation in texture and taste. The tangy, tropical sweetness of pineapple cuts through the rich, velvety blanket of sweetened cream cheese, all held together by the caramel-like depth of condensed milk. It’s a quick no-bake dessert that feels indulgent, looks impressive, and comes together in under 20 minutes of active time. This is the perfect potluck dessert, the easy summer treat, and the go-to slice for when you want maximum reward for minimal effort.
Why This 3-Ingredient Wonder Works
The beauty of this slice lies in the synergy of its components. Each ingredient plays a critical role:
· Cream Cheese: Provides structure, a rich tangy base, and that classic “cheesecake” flavor and mouthfeel without any baking.
· Sweetened Condensed Milk: Acts as the sweetener, binder, and setting agent. Its thick, sticky consistency helps the slice firm up in the fridge and adds a distinctive, milky sweetness.
· Canned Pineapple: Offers juicy bursts of tropical flavor and acidity that balance the intense sweetness and richness. The syrup from the can also helps bind everything together.
Together, they create a foolproof formula for a dessert that’s both stable and delightfully creamy.
The Complete Recipe: Perfect No-Bake Pineapple Slice
Prep Time: 15 minutes | Chill Time: 4+ hours (overnight best) | Total Time: 4 hours 15 min | Yield: One 8×8 inch slice (9-12 generous pieces)
Ingredients:
For the Base (Choose One):
· 2 cups (200g) crushed digestive biscuits or graham crackers
· 1/2 cup (115g) unsalted butter, melted
· OR, for an even easier option: A pre-made sweet pastry or graham cracker crust.
For the Legendary Filling:
· 1 (8 oz / 250g) block full-fat cream cheese, softened to room temperature
· 1 (14 oz / 400g) can sweetened condensed milk
· 1 (20 oz / 565g) can crushed pineapple in juice (NOT syrup), very well drained
· 2 tablespoons fresh lemon juice (optional but recommended for balance)
· 1 teaspoon pure vanilla extract (optional)
For Topping (Optional but Glorious):
· Extra well-drained crushed pineapple
· Toasted coconut flakes
· A dollop of whipped cream
Step-by-Step Instructions:
Step 1: Prepare the Pan & Base
Line an 8×8 inch square baking pan with parchment paper, leaving an overhang on two sides. This “sling” will make it incredibly easy to lift out the whole slice for clean cutting.
If making a biscuit base: Place biscuits in a zip-top bag and crush finely with a rolling pin, or pulse in a food processor. Combine crumbs with melted butter in a bowl until it resembles wet sand.
Press the crumb mixture firmly and evenly into the bottom of the prepared pan. Use the bottom of a glass to get it compact and smooth. Place the pan in the freezer for 10-15 minutes to set while you make the filling.
Step 2: Create the Creamy Pineapple Filling
DRAIN THE PINEAPPLE: This is the most crucial step for a firm slice. Place the crushed pineapple in a fine-mesh sieve over a bowl. Use the back of a spoon to press down firmly and squeeze out as much excess juice as possible. Let it sit and drain while you prepare the rest. (Save the juice for a smoothie!)
In a large mixing bowl, beat the softened cream cheese with an electric mixer on medium-high speed until it is completely smooth, creamy, and free of any lumps. Scrape down the sides of the bowl.
With the mixer on low, gradually pour in the entire can of sweetened condensed milk. Increase speed to medium and beat until the mixture is completely uniform, smooth, and slightly thickened.
Add the optional lemon juice and vanilla extract, if using, and beat just to combine.
Fold, Don’t Mix: Using a spatula, gently fold in the very well-drained crushed pineapple. Folding ensures you maintain the airy texture of the cream cheese mixture.
Step 3: Assemble and Set
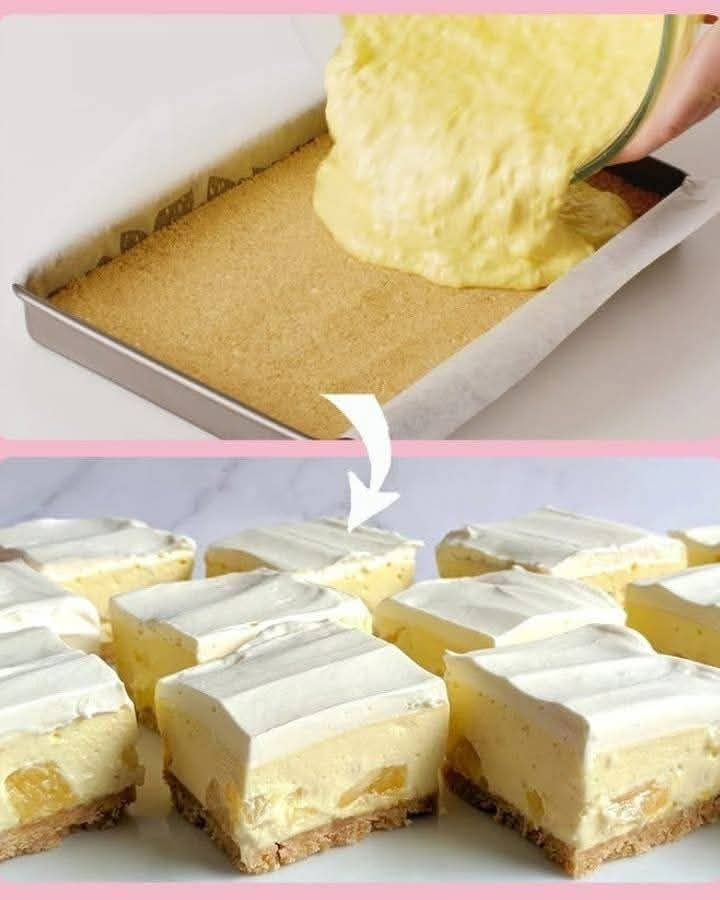
Remove the pan from the freezer. Pour the creamy pineapple filling over the set base.
Smooth the top with an offset spatula or the back of a spoon.
If desired, sprinkle the top with a thin layer of extra drained pineapple or toasted coconut.
Cover the pan tightly with plastic wrap and refrigerate for at least 4 hours, but ideally overnight. This patient chilling is non-negotiable for the perfect, firm, sliceable texture.
Step 4: Slice and Serve
To serve, use the parchment paper sling to lift the entire slice out of the pan and onto a cutting board.
Dip a sharp knife in hot water, wipe it dry, and cut into clean squares. Wipe the knife clean between cuts for perfect edges.
Serve cold, with an optional extra dollop of whipped cream.
Chef’s Pro-Tips for the Absolute Best Results
· The Drain Game is Everything: The more liquid you remove from the pineapple, the firmer your slice will set. For the ultimate result, after draining in a sieve, spread the pineapple on a double layer of paper towels and press gently to absorb the last bits of moisture.
· Room Temp is Key: Softened cream cheese blends seamlessly, preventing a grainy texture. Take it out of the fridge 1-2 hours before you start.
· Sweetness Balance: The lemon juice is not just for flavor—its acidity brilliantly balances the sweetness of the condensed milk and enhances the pineapple flavor. Don’t skip it!
· Texture Variations: For a chunkier bite, use canned pineapple tidbits (well-drained) instead of crushed. For a smoother, more uniform filling, stick with crushed.
Flavor Twists & Variations
This recipe is a perfect canvas for creativity:
· Tropical Twist: Fold in 1/2 cup of toasted coconut flakes into the filling along with the pineapple.
· Piña Colada Slice: Use 1 teaspoon of coconut extract (in addition to or instead of vanilla) and add the toasted coconut.
· Citrus Burst: Add the zest of one lime or lemon to the filling for a bright, aromatic punch.
· Nutty Crunch: Add 1/2 cup of finely chopped macadamia nuts or pecans to the biscuit base or sprinkle on top.
Storing Your No-Bake Masterpiece
· Refrigerator: Store covered tightly in the pan or an airtight container for up to 5 days.
· Freezer: This slice freezes exceptionally well! Wrap individual squares or the whole block tightly in plastic wrap and then foil. Freeze for up to 2 months. Thaw overnight in the refrigerator.
Frequently Asked Questions (FAQ)
Q: Can I use fresh pineapple instead of canned?
A:It’s not recommended. Fresh pineapple contains an enzyme (bromelain) that breaks down dairy proteins, which can prevent your slice from setting properly and give it a weird, watery texture. Canned pineapple is cooked during canning, which deactivates this enzyme.
Q: My mixture seems too runny. What did I do wrong?
A:The most common culprit is undrained pineapple. Also, ensure your cream cheese was full-fat and properly softened, not melted. Don’t worry—extra chilling time (overnight) will fix a lot!
Q: Can I make this without a base?
A:Absolutely! Simply pour the filling into a lined pan and chill. You’ll have a delicious, mousse-like pineapple dessert perfect for serving in glasses.
Q: Is this like a no-bake cheesecake?
A:Yes, essentially! It has all the creamy, tangy hallmarks of a cheesecake filling but is simplified and specifically flavored with pineapple. It’s a cheesecake’s easier, tropical cousin.
The Final Slice: Simplicity at its Most Delicious
This 3-ingredient no-bake pineapple slice is proof that incredible desserts don’t require complexity, expensive ingredients, or hours of labor. It’s a testament to the magic that happens when a few pantry staples come together with a little know-how. Creamy, sweet, tangy, and refreshing—it’s the answer to your dessert dilemmas all year round.
So next time the heat is on or time is short, remember this formula: Canned Pineapple + Condensed Milk + Cream Cheese = Pure, Unadulterated Joy. Whip it up, let the fridge do the work, and get ready to receive the compliments.
Have you tried this legendary no-bake combo? What’s your favorite twist on it? Share your creations, tips, and stories in the comments below—let’s celebrate the joy of easy, delicious desserts together!
P.S. Know someone who needs a lifesaver dessert recipe? Share this article with them! And for more quick, no-bake treats, subscribe and never miss a recipe
More Recipes You Might Like
-

Cheesy Potato Patties 😋 – Crispy, Golden, and Irresistibly Cheesy If you’re looking for a high-RPM comfort food recipe that gets clicks, saves, and repeat cooks, Cheesy Potato Patties are a guaranteed winner. Crispy on the outside, soft and fluffy on the inside, and loaded with melty cheese—this recipe checks every box readers love: easy…
-

Brown Sugar Pineapple Ham Bake 😋 – The Ultimate Sweet & Savory Comfort Dish If you’re searching for a high-RPM, comfort-food recipe that people love clicking, saving, and cooking again and again, this Brown Sugar Pineapple Ham Bake is it. Sweet, sticky brown sugar. Juicy pineapple. Tender, savory ham. Baked together into one irresistible dish…
-

Angel Chicken Pasta – The Creamy Comfort Food That Everyone Loves
Few dishes feel as comforting, indulgent, and crowd-pleasing as Angel Chicken Pasta. This creamy, slow-cooked chicken pasta recipe has earned its name because it’s truly heavenly—rich, velvety sauce, tender chicken, and perfectly cooked pasta all coming together in one unforgettable meal. Angel Chicken Pasta is one of those recipes that never goes out of style.…