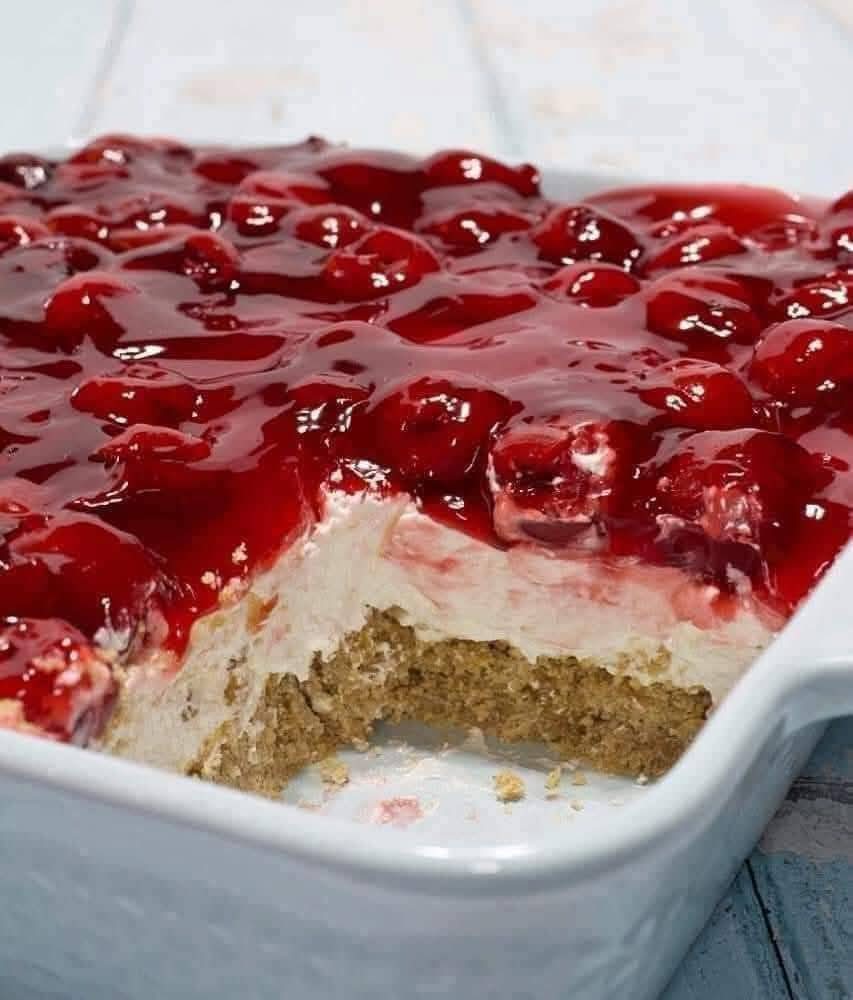
Is there a dessert more universally beloved, more reliably delightful, than the one with “delight” right in its name? Picture this: a buttery, crumbly crust, a layer of impossibly creamy and sweet cheese filling, all crowned with a glossy blanket of vibrant cherry pie filling. Each spoonful is a perfect harmony of texture and taste—a classic no-bake dessert that feels like a hug from simpler times. If you’re searching for an easy potluck dessert that will have people asking for the recipe, a make-ahead summer treat that requires zero oven time, or just a family-friendly dessert that delivers pure joy, you’ve found your holy grail.
Classic Cherry Delight isn’t just a recipe; it’s a piece of culinary nostalgia. It’s the dessert that graced every church supper, family reunion, and holiday table of the 70s and 80s for one undeniable reason: it is utterly, completely delicious. And in our busy modern world, its no-bake, easy-assembly nature makes it more relevant than ever. This is your guide to creating the perfect version—one with a sturdy crust, a filling that’s light yet rich, and that iconic cherry topping that shines like ruby jewels. Let’s recreate a timeless American dessert that will delight a whole new generation.
Why Classic Cherry Delight Deserves a Comeback
In an era of intricate baking shows and complex recipes, the humble Cherry Delight stands tall. Its virtues are numerous and compelling:
· The Ultimate No-Bake Savior: On hot summer days or during hectic holidays, the last thing you want is to turn on the oven. This dessert comes together entirely on the stovetop and in the fridge.
· Make-Ahead Perfection: In fact, it requires advance chilling. This makes it the perfect dessert for entertaining; you can cross it off your list hours or even a day before your guests arrive.
· Foolproof & Forgiving: No tempering eggs or precise baking times. It’s a layered assembly that is incredibly hard to mess up, making it ideal for beginner bakers.
· Crowd-Pleasing Magic: Its familiar, sweet-tart flavor profile and creamy texture appeal to virtually every age and taste preference. It’s a guaranteed crowd-pleasing dessert.
· Endlessly Adaptable Canvas: Master the basic formula, and a world of variations opens up: blueberry, peach, strawberry, or even chocolate pudding variations.
The Anatomy of Perfect Delight: A Layer-by-Layer Ingredient Deep Dive
The brilliance of this dessert is in its three distinct, complementary layers. Understanding the role of each ingredient is the key to mastering it.
Layer 1: The Graham Cracker Crust – The Essential Foundation
A great crust should be sturdy enough to hold a slice but tender enough to cut with a spoon.
· Graham Cracker Crumbs: You can buy pre-crushed crumbs or pulse whole graham crackers in a food processor until fine. About 9 full sheets will yield 1 ½ cups.
· Granulated Sugar: A little sugar sweetens the crust and helps it caramelize slightly for better structure.
· Unsalted Butter, Melted: The binder. Using unsalted butter lets you control the salt level. The butter must be fully melted to evenly coat the crumbs. Pro Tip: For a deeper flavor, use browned butter. Simply melt the butter in a saucepan over medium heat and continue cooking until it turns a fragrant, nutty golden brown.
Layer 2: The Cream Cheese Filling – The Heart of the Delight
This is where luxury lives. The goal is a cloud-like, smooth, and stable filling.
· Full-Fat Cream Cheese: Non-negotiable. Use brick-style cream cheese, not the spreadable kind from a tub. It must be completely softened to room temperature to avoid a lumpy filling. Take it out 1-2 hours ahead.
· Powdered Sugar: Also called confectioners’ sugar. It dissolves instantly into the cream cheese, creating a silky texture without graininess. It also contains a bit of cornstarch, which helps stabilize the filling.
· Cool Whip or Homemade Stabilized Whipped Cream: This is the great debate!
· Cool Whip (The Classic Choice): Traditional, stable, and holds its shape for days. It gives that authentic, nostalgic texture.
· Homemade Whipped Cream (The Gourmet Touch): Whip 1 ½ cups of heavy cream with 3 tablespoons of powdered sugar and 1 teaspoon of vanilla until stiff peaks form. It’s richer and less sweet. For stability, add a tablespoon of instant vanilla pudding powder while whipping.
Layer 3: The Cherry Topping – The Jewel-Toned Crown
This provides the necessary bright, fruity contrast to the rich filling.
· Canned Cherry Pie Filling: The convenient champion. Look for a quality brand with plump cherries. “Comstock” or “Wilderness” are classic choices.
· Elevating the Topping (Optional but Transformative): For a less sweet, more complex flavor, add a splash of almond extract (¼ tsp) or lemon juice (1 tbsp) to the pie filling. For a fresh twist, fold in 1 cup of fresh, pitted, and halved cherries into the canned filling.
Step-by-Step Assembly for Flawless Layers
The method is simple, but a few pro tips ensure every layer is pristine.
Phase 1: The Crust – Press, Don’t Pour
Combine: In a medium bowl, stir the graham cracker crumbs, sugar, and melted butter until the mixture resembles wet sand.
Press Firmly: Dump the mixture into an ungreased 9×13-inch baking dish or a 9-inch springform pan for a taller, more elegant presentation. The Key Technique: Use the bottom of a flat measuring cup or a glass to press the crumbs into an even, compact layer across the bottom and slightly up the sides. This compacting is what prevents a crumbly, messy crust.
Chill: Place the crust in the refrigerator for at least 15-20 minutes to set while you make the filling. This helps it firm up.
Phase 2: The Filling – Whip It Good
Beat the Cream Cheese: In a large bowl using a hand mixer or stand mixer fitted with the paddle attachment, beat the softened cream cheese on medium-high speed for 1-2 minutes until completely smooth and creamy. Scrape down the bowl.
Incorporate Sugar: Add the powdered sugar and vanilla extract. Beat on low initially to avoid a sugar cloud, then increase to medium-high until fully combined and smooth.
Lighten the Mix: If using Cool Whip, gently fold it into the cream cheese mixture with a spatula until no white streaks remain. If using homemade whipped cream, gently fold it in at this stage. Do not overmix. You want to keep the airy volume.
Phase 3: Assembly & The Crucial Chill
Layer the Filling: Remove the chilled crust from the fridge. Spread the cream cheese mixture evenly over the crust, going all the way to the edges.
Add the Topping: Spoon the cherry pie filling over the cream cheese layer. Use the back of the spoon to spread it gently into an even layer.
The Patient Chill: This is the most important step. Cover the dish with plastic wrap and refrigerate for at least 4 hours, but ideally overnight. Why This Works: This extended chilling time allows the crust to fully hydrate and set, the filling to firm up perfectly for clean slices, and all the flavors to meld together harmoniously.
Serving Suggestions & Presentation Ideas
Presentation elevates this homey dessert to party status.
· Classic & Comforting: Serve in simple squares right from the 9×13 pan. A dollop of extra whipped cream on top never hurts.
· Elegant Individual Portions: For a dinner party, layer the components in pretty glasses or mason jars for easy individual desserts. Crust, then filling, then cherries, and repeat.
· The Springform Showstopper: If using a springform pan, run a knife around the edge, then carefully release the ring. Transfer the whole, beautiful circle to a cake stand. Garnish the outer edge with fresh whipped cream rosettes and whole fresh cherries.
· Garnish Game: A sprinkle of graham cracker crumbs, sliced almonds, chocolate shavings, or a light dusting of powdered sugar adds a professional finish.
Storage & Make-Ahead Instructions
This dessert’s make-ahead nature is its superpower.
· Refrigeration: Store covered tightly with plastic wrap or in an airtight container in the refrigerator for up to 4 days.
· Freezing: Yes, you can freeze it! Wrap the entire pan (or individual slices) tightly in plastic wrap and then aluminum foil. Freeze for up to 2 months. Thaw overnight in the refrigerator before serving. Note: The cherry topping may release a bit more liquid upon thawing, but the flavor will still be excellent.
Frequently Asked Questions (FAQ)
Q: Can I use fresh cherries instead of pie filling?
A: Absolutely.Make a quick compote: pit and halve 3 cups of fresh cherries. In a saucepan, combine them with ½ cup sugar, ½ cup water or cherry juice, 2 tbsp cornstarch, and a squeeze of lemon juice. Cook over medium heat, stirring, until thickened and bubbly. Let cool completely before using.
Q: My cream cheese filling is lumpy. What can I do?
A:This is almost always because the cream cheese was too cold. To fix it, you can try beating it longer, or for a surefire solution, press the filling through a fine-mesh sieve. For next time, ensure your cream cheese sits out until it’s very soft.
Q: Is there a way to make this lighter?
A:You can use Neufchâtel cheese (⅓ less fat cream cheese) and fold in light Cool Whip or whipped cream made from light whipping cream. The texture will be slightly less rich but still delicious.
Q: Can I use a different crust?
A:Of course! Vanilla wafer crumbs, shortbread cookie crumbs, or even a pretzel crust (for a sweet-salty twist) work wonderfully. Use the same 1 ½ cup crumb to 6-7 tbsp butter ratio.
Q: Why did my crust get soggy?
A:Sogginess comes from not chilling the crust before adding the filling, or not chilling the assembled dessert long enough. The initial chill sets the butter, creating a moisture barrier.
Conclusion: A Timeless Treat for New Memories
Classic Cherry Delight is more than a retro recipe; it’s a testament to the enduring power of simple, well-layered flavors and effortless preparation. It’s a dessert that promises and delivers pure, uncomplicated pleasure. In a world of fussy pastries, it remains a steadfast favorite because it works, every single time, to bring smiles to the table.
I’d love to see your delightful creation! Did you make it in a springform pan? Try a different fruit topping? Share a photo of your beautiful dessert and tag it #MyCherryDelight. And if you love this no-bake classic, you must try my Heavenly Pineapple Dream Dessert—another vintage gem that’s ready to make a delicious comeback.
Classic Cherry Delight
Prep Time: 25 mins | Chill Time: 4+ hours | Total Time: 4 hours 25 mins | Servings: 12
Course: Dessert | Cuisine: American
Keywords: classic cherry delight, no bake dessert, easy potluck dessert, make ahead dessert, vintage dessert recipe, cherry cream cheese dessert, no bake summer dessert, crowd pleasing dessert, family friendly dessert, easy holiday dessert, graham cracker crust dessert, retro recipes, quick dessert
Description: The ultimate no-bake vintage dessert! A buttery graham cracker crust, a lush sweet cream cheese layer, and a glossy cherry topping come together in this easy, crowd-pleasing classic.
Ingredients:
For the Crust:
· 1 ½ cups graham cracker crumbs (about 9 full sheets)
· ⅓ cup granulated sugar
· 7 tablespoons unsalted butter, melted
For the Filling:
· 16 ounces (2 blocks) full-fat cream cheese, softened to room temperature
· 1 cup powdered sugar
· 1 teaspoon pure vanilla extract
· 1 (8 oz) container Cool Whip, thawed (or 1 ½ cups homemade stabilized whipped cream)
For the Topping:
· 2 (21 oz) cans cherry pie filling
· Optional: ¼ teaspoon almond extract or 1 tablespoon lemon juice
Instructions:
Make Crust: In a bowl, mix graham cracker crumbs, sugar, and melted butter. Press firmly and evenly into the bottom of an ungreased 9×13-inch pan. Refrigerate for 15-20 minutes.
Make Filling: In a large bowl, beat softened cream cheese with an electric mixer until smooth. Add powdered sugar and vanilla; beat until creamy and combined.
Fold: Gently fold the thawed Cool Whip (or homemade whipped cream) into the cream cheese mixture until uniform.
Assemble: Spread filling evenly over the chilled crust. If desired, stir almond extract or lemon juice into the cherry pie filling. Spoon cherry topping evenly over the cream cheese layer.
Chill: Cover and refrigerate for at least 4 hours, or preferably overnight, to set completely.
Serve: Cut into squares and serve chilled. Store leftovers covered in the refrigerator.
Notes:
· Cream Cheese Tip: Ensure cream cheese is very soft for a lump-free filling.
· Homemade Whipped Cream: Whip 1 ½ cups heavy cream with 3 tbsp powdered sugar and 1 tsp vanilla until stiff peaks form. For stability, add 1 tbsp instant vanilla pudding powder while whipping.
· Fresh Cherry Option: See FAQ for a quick homemade cherry compote recipe.
· Pan Choice: For cleaner slices and a taller dessert, use a 9-inch springform pan. Chill thoroughly before releasing the ring.
More Recipes You Might Like
-

Cheesy Potato Patties 😋 – Crispy, Golden, and Irresistibly Cheesy If you’re looking for a high-RPM comfort food recipe that gets clicks, saves, and repeat cooks, Cheesy Potato Patties are a guaranteed winner. Crispy on the outside, soft and fluffy on the inside, and loaded with melty cheese—this recipe checks every box readers love: easy…
-

Brown Sugar Pineapple Ham Bake 😋 – The Ultimate Sweet & Savory Comfort Dish If you’re searching for a high-RPM, comfort-food recipe that people love clicking, saving, and cooking again and again, this Brown Sugar Pineapple Ham Bake is it. Sweet, sticky brown sugar. Juicy pineapple. Tender, savory ham. Baked together into one irresistible dish…
-

Angel Chicken Pasta – The Creamy Comfort Food That Everyone Loves
Few dishes feel as comforting, indulgent, and crowd-pleasing as Angel Chicken Pasta. This creamy, slow-cooked chicken pasta recipe has earned its name because it’s truly heavenly—rich, velvety sauce, tender chicken, and perfectly cooked pasta all coming together in one unforgettable meal. Angel Chicken Pasta is one of those recipes that never goes out of style.…