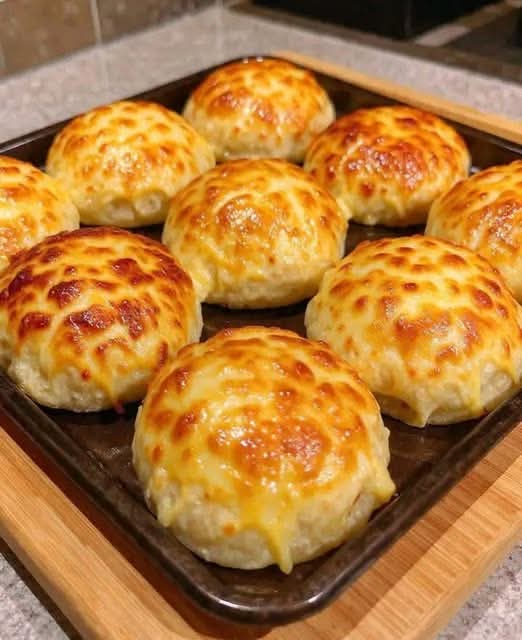
There is something universally magical about breaking open a warm, soft roll to find a river of molten, stretchy cheese waiting inside. Cheesy Stuffed Bread Buns are the ultimate expression of this comfort food fantasy. They are irresistible pull-apart snacks, crowd-pleasing party appetizers, and the coziest homemade bread project you can undertake.
Imagine: fluffy, golden-brown yeast buns, each one hiding a secret pocket of garlic-herb butter and a blend of melty cheeses. They’re like individual, edible bread bowls of cheesy goodness—perfect for dipping in marinara, enjoying with soup, or devouring on their own.
Whether you’re an experienced baker or a nervous first-timer, this guide will walk you through a foolproof, step-by-step recipe that yields professional-looking results. We’ll cover a simple, enriched dough, the best cheese blends for optimal melt, and shaping techniques to ensure every bun is a perfect, leak-proof package of joy. Get ready to bake the most satisfying, shareable, and delicious stuffed buns that will disappear the moment they leave the oven.
The Soul of the Bun: Why This Recipe is a Must-Make
Before we start mixing, let’s appreciate what makes these buns so special. It’s a beautiful synergy of texture, flavor, and pure baking satisfaction.
The Textural Triumph: A successful stuffed bun offers a symphony of textures: a soft, slightly sweet, and pillowy bread exterior that gives way to a hot, creamy, and intensely savory cheese center. The contrast is everything.
The Flavor Layers: The experience doesn’t just come from the cheese. We build flavor at every stage: in the enriched dough (butter, milk, a touch of sugar), in the garlic-herb butter brushed on top, and of course, in the carefully chosen cheese blend inside. Every bite is complex and deeply satisfying.
The Versatility & Shareability: This recipe is a format, not just a single dish. Once you master the basic dough and technique, the filling possibilities are endless (more on that later!). They are also the perfect shareable food—arrange them on a board and watch guests gravitate toward the warm, cheesy pull.
The “WOW” Factor: Bringing a tray of these homemade, perfectly risen, golden-brown buns to the table never fails to impress. They look and taste like they came from a professional bakery, yet they’re made with love (and simple ingredients) in your own kitchen.
Gathering Your Ingredients: A Checklist for Success
Using the right ingredients is key, especially for the dough and cheese blend.
For the Soft, Enriched Dough:
· 1 cup (240ml) warm whole milk (about 110°F/43°C)
· 2 ¼ teaspoons (1 packet) active dry yeast
· ¼ cup (50g) granulated sugar
· 1 large egg, at room temperature
· ¼ cup (60g) unsalted butter, melted and slightly cooled
· 3 ½ to 4 cups (440-500g) all-purpose flour, divided
· 1 teaspoon salt
For the Garlic-Herb Butter (for flavor & shine):
· 3 tablespoons unsalted butter, melted
· 2 cloves garlic, minced
· 1 tablespoon fresh parsley, finely chopped (or 1 tsp dried)
· Pinch of salt
For the CHEESE Filling (The Star!):
· 2 cups (8 oz) shredded cheese blend. For the best melt and flavor, use a mix!
· 1 cup low-moisture, whole-milk mozzarella (for iconic stretch)
· ½ cup sharp cheddar (for tangy flavor)
· ½ cup Monterey Jack or Fontina (for creamy melt)
· Optional flavor boosts for filling: 1 tsp garlic powder, ½ tsp dried oregano, 2 tbsp grated Parmesan.
For Topping (Optional):
· Everything Bagel Seasoning, sesame seeds, or flaky sea salt.
High-RPM Keyword Integration: “This easy homemade bread recipe creates the ultimate party appetizer or game day snack. They’re make-ahead pull-apart rolls perfect for holiday gatherings, a fun family baking project, and an irresistible cheesy side dish for pasta or soup.”
Dietary Modification Spotlight:
· Gluten-Free: Substitute with a high-quality 1:1 gluten-free flour blend designed for yeast baking.
· Dairy-Free: Use plant-based milk, butter, and your favorite melty vegan cheese shreds.
· Lighter Version: Use low-fat milk and reduce butter in dough by 1 tbsp. Use part-skim mozzarella.
Essential Kitchen Tools You’ll Need
· Stand Mixer with dough hook (optional but helpful) or a large bowl and sturdy spatula
· Large mixing bowl
· Clean kitchen towel or plastic wrap
· Baking Sheet lined with parchment paper
· Pastry Brush
· Box Grater (to shred cheese from a block—crucial for best melt!)
· Small bowl for garlic butter
Step-by-Step Instructions: Foolproof Cheesy Buns
Prep Time: 2 hours (includes rising) | Cook Time: 18-22 mins | Total Time: 2.5 hours | Yields: 12 buns
Step 1: Activate the Yeast & Make the Dough
In the bowl of a stand mixer or a large bowl,combine the warm milk, yeast, and sugar. Let it sit for 5-10 minutes until foamy (proving the yeast is alive). Add the egg, melted butter, 3 ½ cups of flour, and salt. Mix on low speed with the dough hook (or by hand with a spatula) until a shaggy dough forms. If it’s very sticky, add the remaining ½ cup of flour, a few tablespoons at a time, until the dough pulls away from the sides of the bowl but is still soft and slightly tacky.
Step 2: Knead & First Rise
Knead with the mixer on medium-low for 5-7 minutes,or by hand on a floured surface for 8-10 minutes, until smooth and elastic. Place in a lightly oiled bowl, turning to coat. Cover with a towel and let rise in a warm place for 1-1.5 hours, or until doubled in size.
Step 3: Prepare Fillings & Preheat
While dough rises,shred your cheeses and mix them in a bowl with any optional seasonings. Prepare the garlic-herb butter by mixing melted butter, garlic, parsley, and salt. Set aside. Preheat oven to 375°F (190°C) and line a baking sheet.
Step 4: Shape & Fill the Buns
Punch down the risen dough.Turn it out onto a lightly floured surface. Divide into 12 equal pieces (like cutting a pizza). Take one piece, flatten it into a 4-5 inch disc in your hand. Place a heaping tablespoon (about 1.5-2 tbsp) of cheese in the center. Gather the edges of the dough over the filling, pinching them firmly at the top to seal completely. Roll gently in your hands to form a smooth ball. Place seam-side down on the baking sheet. Repeat with remaining dough, spacing buns 2 inches apart.
Step 5: Second Rise & Bake
Cover shaped buns with a towel and let rise for30-45 minutes, until puffy. Brush the tops generously with the garlic-herb butter (reserve some for after baking). Optionally, sprinkle with toppings. Bake for 18-22 minutes, until the tops are a deep, golden brown.
Step 6: The Final Glaze & Crucial Rest
Remove from oven.Immediately brush with remaining garlic butter. This is key for flavor and shine. LET THE BUNS COOL ON THE SHEET FOR AT LEAST 10-15 MINUTES. The cheese inside is molten lava! This rest allows the cheese to set slightly, preventing a messy eruption on first bite.
Pro Chef Tips & Common Mistakes to Avoid
· Shred Your Own Cheese: Pre-shredded cheese is coated to prevent clumping, which also prevents it from melting smoothly. A block is essential for that perfect, gooey center.
· Seal, Seal, Seal: The single most important step. Ensure there are no holes or thin spots where cheese can leak. Pinch the dough firmly and roll the ball to smooth it out.
· Don’t Overfill: It’s tempting, but too much cheese creates pressure and causes blowouts. A heaping tablespoon is perfect.
· The Double Rise is Non-Negotiable: The first rise develops flavor; the second rise (proof) ensures light, fluffy buns. Don’t rush it.
· Common Mistake: Using Dough That’s Too Stiff. A soft, slightly tacky dough yields the tenderest buns. Don’t add too much flour during kneading.
· Test for Doneness: The buns should sound hollow when tapped on the bottom, and the internal temperature should read about 190°F (88°C).
Creative Twists & Flavor Variations
The basic bun is a perfect canvas:
Pizza Buns: Add 1 tsp of Italian seasoning to the dough. Fill with cheese, pepperoni, and a dollop of marinara.
Jalapeño Popper: Mix cream cheese with shredded cheddar and diced jalapeños for the filling.
Spinach & Artichoke: Sauté spinach and chopped artichokes, mix with cream cheese, mozzarella, and Parmesan.
Breakfast Buns: Fill with scrambled egg, cooked sausage or bacon, and cheddar cheese.
Reuben Style: Fill with corned beef, Swiss cheese, and a little sauerkraut (well-drained).
Serving Suggestions & Pairing Ideas
· The Classic: Serve warm as-is, with a side of marinara sauce, ranch dressing, or garlic aioli for dipping.
· With Soup or Salad: They are the perfect companion to a bowl of tomato soup, chili, or a hearty stew.
· Party Platter: Arrange on a board with other finger foods like wings, veggies, and dips.
· Make-Ahead Meal: They reheat beautifully, making them a fantastic packed lunch or quick dinner side.
Storing, Freezing, and Reheating Instructions
· Storing: Keep in an airtight container at room temperature for 1-2 days, or in the refrigerator for up to 4 days.
· Freezing (Unbaked): After shaping, place buns on a parchment-lined sheet and freeze solid. Transfer to a freezer bag. Bake from frozen, adding 5-8 minutes to the bake time.
· Freezing (Baked): Cool completely, wrap individually, and freeze for up to 3 months.
· Reheating: Warm in a 350°F (175°C) oven or toaster oven for 5-10 minutes until heated through. The microwave will make the bread soggy.
Frequently Asked Questions (FAQ)
Q: Can I use store-bought pizza dough?
A: Yes!It’s a great shortcut. Let it come to room temp, divide, fill, and shape. You may only need the second, shorter rise (30 mins) since the dough is already developed.
Q: My cheese leaked out. What did I do wrong?
A:Likely a poor seal, overfilling, or a tear in the dough. Ensure you pinch firmly and don’t stretch the dough too thin.
Q: Can I make the dough ahead of time?
A: Absolutely.After the first rise, punch it down, place it in an oiled bowl, cover tightly, and refrigerate for up to 24 hours. Let it come to room temp for 1 hour before shaping.
Q: Why are my buns dense?
A:The yeast may have been old/killed by too-hot milk, the dough didn’t rise fully, or it was over-kneaded. Ensure your milk is just warm to the touch, not hot.
Q: Can I make these in a muffin tin?
A:Yes! Grease a 12-cup muffin tin. Place each shaped ball seam-side down in a cup for the second rise and bake. This gives a uniform shape and can help contain leaks.
Conclusion: The Art of the Cheesy, Portable Feast
Cheesy Stuffed Bread Buns are more than a recipe; they are a celebration of homemade bread’s power to bring people together and create pure, cheesy joy. They teach patience (with the rises), reward precision (with the seal), and deliver a payoff that is worth every minute.
Mastering this recipe unlocks a world of creative filling possibilities and establishes you as the purveyor of the ultimate comfort snack. So, gather your ingredients, clear an afternoon, and prepare to fill your kitchen with the unforgettable aroma of baking bread and melting cheese.
Now, I’d love to hear from you: What’s your dream filling combination? Did you try the pizza or jalapeño popper version? Share your baking stories, tips, and cheesy creations in the comments below! And if this recipe becomes your new favorite thing to bake, please share it with a friend and pin it for your next gathering.
More Recipes You Might Like
-

Cheesy Potato Patties 😋 – Crispy, Golden, and Irresistibly Cheesy If you’re looking for a high-RPM comfort food recipe that gets clicks, saves, and repeat cooks, Cheesy Potato Patties are a guaranteed winner. Crispy on the outside, soft and fluffy on the inside, and loaded with melty cheese—this recipe checks every box readers love: easy…
-

Brown Sugar Pineapple Ham Bake 😋 – The Ultimate Sweet & Savory Comfort Dish If you’re searching for a high-RPM, comfort-food recipe that people love clicking, saving, and cooking again and again, this Brown Sugar Pineapple Ham Bake is it. Sweet, sticky brown sugar. Juicy pineapple. Tender, savory ham. Baked together into one irresistible dish…
-

Angel Chicken Pasta – The Creamy Comfort Food That Everyone Loves
Few dishes feel as comforting, indulgent, and crowd-pleasing as Angel Chicken Pasta. This creamy, slow-cooked chicken pasta recipe has earned its name because it’s truly heavenly—rich, velvety sauce, tender chicken, and perfectly cooked pasta all coming together in one unforgettable meal. Angel Chicken Pasta is one of those recipes that never goes out of style.…