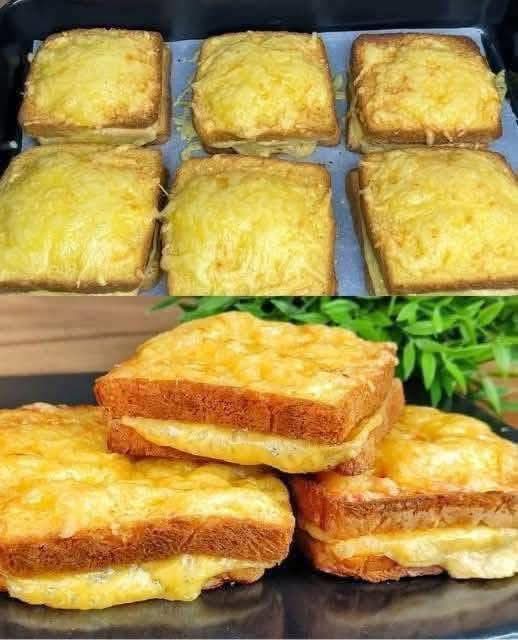
Is there any food more universally comforting than a perfectly executed grilled cheese sandwich? That golden, shatteringly crisp exterior giving way to a river of molten, stretchy cheese is a masterpiece of simple cooking. Yet, achieving that ideal balance at home can be fraught with peril: burnt butter, uneven browning, cheese that stubbornly refuses to melt while the bread chars.
Enter the hero we didn’t know we needed: the air fryer. This modern kitchen marvel isn’t just for fries and chicken wings—it’s the secret weapon for creating the best grilled cheese sandwich of your life. It delivers crazy-crispy bread without deep-frying, perfectly melted cheese every single time, and does it all with minimal mess and hands-off ease. This method is a game-changer for quick lunches, easy family dinners, and late-night cravings.
This isn’t just a recipe; it’s a blueprint for grilled cheese nirvana. We’ll explore the science behind the air fryer’s magic, the best bread and cheese combinations, and pro tips to elevate this humble sandwich into something extraordinary. Get ready to make a grilled cheese that’s crispy on the outside, gloriously gooey on the inside, and reliably perfect—no flipping or spattering butter required. Your stovetop pan is about to get jealous.
Why the Air Fryer is the Ultimate Grilled Cheese Machine
Before we assemble our sandwich, let’s understand why the air fryer method is superior. It all comes down to the mechanics of hot, circulating air.
The Crisp Factor: A traditional grilled cheese relies on conductive heat from a pan to crisp the bread, often leading to hot spots. The air fryer uses rapid air circulation to envelop the entire sandwich in intense, dry heat. This creates an incredibly even, all-over crispiness that’s closer to a panini press than a skillet, without needing to press it down.
The Melt Mastery: The sealed environment of the air fryer acts like a miniature convection oven. The hot air melts the cheese from the outside in, ensuring it becomes completely liquefied and stretchy by the time the bread reaches golden-brown perfection. No more raw, unmelted cheese centers!
The Effortless Equation: This is perhaps the biggest win. No standing over the stove, no careful flipping, no butter splatters. You assemble, you set the timer, and you walk away. It’s the ultimate easy, low-mess cooking method, making it perfect for busy weeknights or when cooking with kids.
Consistency is King: Once you find your perfect time and temperature for your specific air fryer model, you can replicate that perfect sandwich endlessly. It removes the guesswork and variables of stovetop heat.
Understanding this empowers you to trust the process. Now, let’s build our masterpiece.
Gathering Your Ingredients: The Foundation of Flavor
The beauty of a grilled cheese is its simplicity, which means every ingredient matters exponentially. Here’s your checklist for the ultimate sandwich.
The Essential Duo:
· Bread (2 slices per sandwich): This is your structural foundation.
· Best Choices: Sourdough (for tangy flavor and sturdy crumb), thick-sliced white or potato bread (for classic, soft comfort), French bread (for a craggy, crispy exterior), or a rustic artisan bread.
· Pro Tip: Avoid very thin, floppy bread. It can become too crisp and fragile. Slightly stale bread works excellently!
· Cheese (2-3 oz per sandwich): The star of the show. Always grate your own cheese. Pre-shredded cheese contains anti-caking agents (like cellulose) that prevent it from melting as smoothly.
· Melting Champions: Medium cheddar (the classic), Gruyère (nutty and sublime), Gouda (especially smoked), Fontina (incredibly creamy), Monterey Jack (buttery and mild), American (for that ultra-gooey, nostalgic “cheese pull”).
· Pro Strategy: Use a blend! Combine a great melter (like American or Fontina) with a flavor powerhouse (like sharp cheddar or Gruyère).
The Flavor Enhancers:
· Fat for Frying (Choose One):
· Salted Butter, softened: The classic. Spread a thin, even layer on the outside of each bread slice.
· Mayonnaise: A secret weapon for the crispiest grilled cheese ever. The oil and emulsifiers in mayo create an unbelievably golden, crispy, and evenly browned crust. Spread it on the outside just like butter.
· Seasonings: Don’t forget the outside!
· A pinch of garlic powder or onion powder mixed into your butter/mayo.
· A sprinkle of everything bagel seasoning or flaky sea salt on the buttered exterior before cooking.
Dietary Modification Spotlight:
· Gluten-Free: Use your favorite gluten-free bread. It often benefits from the air fryer’s all-over crispness.
· Dairy-Free: Use plant-based butter/mayo and your favorite dairy-free cheese shreds (look for brands that mention “melts well”).
· Vegan: Follow the dairy-free modifications above.
· Lower-Carb/Keto: Use a sturdy keto bread and full-fat cheese.
Essential Kitchen Tools You’ll Need
· Your Air Fryer: Any model or basket style works.
· Box Grater: For grating cheese from a block. Non-negotiable for optimal melt.
· Small Bowl & Pastry Brush (optional): For melting butter or mixing mayo/seasonings.
· Silicone Tongs or Spatula: For safe removal of the hot sandwich.
Step-by-Step Instructions: Foolproof Air Fryer Grilled Cheese
Prep Time: 5 mins | Cook Time: 5-8 mins | Total Time: 10-13 mins | Servings: 1 (easily scaled)
Step 1: Prepare Your Bread
Take your two slices of bread.Using a butter knife, spread your chosen fat (softened butter or mayonnaise) in a thin, even layer on one side of each slice. This will be the glorious, crispy exterior. If using, sprinkle your seasonings onto the buttered/mayo sides now.
Step 2: Build the Sandwich
Place one slice of bread,unbuttered side up, on your work surface. Pile on your generous amount of grated cheese, ensuring it reaches close to the edges but not spilling over. Top with the second slice of bread, buttered/mayo side facing OUT. Press down gently.
Step 3: Into the Air Fryer
Preheat your air fryer to370°F (190°C) for 2-3 minutes if your model recommends it. Place the sandwich in the air fryer basket. Do not overcrowd. You can typically fit 1-2 sandwiches at a time without touching.
Step 4: The Magic Cook
Air fry for5 to 8 minutes. There is NO NEED TO FLIP halfway through! The circulating air cooks it evenly on all sides. The sandwich is done when the exterior is a deep, uniform golden brown and you can see the cheese visibly melted through the sides.
Step 5: The Critical Rest
Use tongs to carefully remove the sandwich.Let it rest on a cutting board for 1-2 minutes before cutting. This allows the molten cheese to set slightly, preventing a catastrophic cheese spill when you bite in.
Pro Chef Tips & Common Mistakes to Avoid
· Grate Your Own Cheese: We cannot stress this enough. It’s the single biggest factor in achieving a luscious, smooth melt.
· Don’t Overload the Basket: Air needs to circulate. Cook in batches if necessary.
· The Mayo Hack is Real: If you’ve never tried mayo instead of butter, please do it once. The crispiness and browning are next-level.
· Watch Closely the First Time: Air fryer temperatures can vary. Start checking at the 5-minute mark to learn your appliance’s sweet spot.
· Room Temperature Cheese Melts Faster: If you have time, let your grated cheese sit out for 10-15 minutes before assembling.
· Common Mistake: Using Cold Butter. It will tear your bread. Ensure your butter is very soft, or use mayo straight from the fridge—it spreads easily even when cold.
Creative Twists & Flavor Variations
Mastered the classic? Time to get creative!
The Gourmet: Sourdough + Gruyère + a thin layer of fig jam or caramelized onions inside.
The Everything: Everything bagel seasoning on the outside, cream cheese + cheddar on the inside.
The Pizza Grilled Cheese: Add a few slices of pepperoni and a spoonful of marinara sauce inside with mozzarella.
The Apple & Cheddar: Add very thin slices of apple or pear inside with sharp cheddar.
The Bacon Ranch: Cooked bacon bits and a drizzle of ranch dressing inside with Monterey Jack.
The “French Onion”: Fill with shredded Swiss/Gruyère and a spoonful of deeply caramelized onions.
Serving Suggestions & Pairing Ideas
· The Classic Combo: Serve with a bowl of tomato soup for dipping—this is non-negotiable comfort food.
· For a Hearty Meal: Pair with a simple side salad (like an arugula salad with lemon vinaigrette) or a cup of canned chili.
· For Kids: Cut into fun “soldiers” or triangles. Serve with apple slices and a small cup of soup.
· The Ultimate Dip: Whisk together a side of sriracha mayo or ranch dressing for dipping.
Storing, Freezing, and Reheating Instructions
· Storing: Best eaten immediately. If you must store, wrap tightly in foil and refrigerate for up to 24 hours.
· Freezing: Not recommended, as the bread texture will suffer.
· Reheating: To recrisp, place a refrigerated sandwich back in the air fryer at 350°F for 2-3 minutes. A toaster oven also works well. The microwave will make it soggy.
Frequently Asked Questions (FAQ)
Q: Do I really not need to flip it?
A:Really and truly! The powerful convection fan circulates heat 360 degrees, cooking the sandwich evenly on all sides. No flipping required.
Q: Why is my cheese not melting?
A:You likely used pre-shredded cheese or didn’t use enough. Always grate your own from a block and be generous!
Q: Can I make multiple sandwiches at once?
A:Yes, as long as they don’t touch or overlap in the basket, which would block airflow. Cook in batches for best results.
Q: What’s the best bread to use?
A:Sturdy breads like sourdough, Texas toast, or a hearty white hold up best. Avoid ultra-soft sandwich bread, which can become too brittle.
Q: Can I add other ingredients like ham or tomato?
A:Absolutely! Add thin slices of ham, tomato, or avocado. Just be aware that very wet ingredients (like fresh tomato) can create steam and slightly soften the bread. Pat tomatoes dry first.
Conclusion: Your New Go-To Recipe for Instant Comfort
The air fryer grilled cheese isn’t just a alternative; for many, it becomes the primary method. It solves all the classic problems and delivers a superior, consistent, and effortless result every single time. It’s a perfect example of how a modern tool can reinvent a timeless classic, making it more accessible and delicious than ever.
So, say goodbye to uneven browning and stubbornly unmelted cheese. Embrace the magic of hot, circulating air. Your journey to the crispiest, gooey-est, most perfect grilled cheese starts now.
Now, I’d love to hear from you: What’s your ultimate grilled cheese combination or secret ingredient? Did the mayo trick blow your mind? Share your creations and tips in the comments below! And if this guide leveled up your grilled cheese game, please share it with a friend and pin it for your next craving.
More Recipes You Might Like
-

Cheesy Potato Patties 😋 – Crispy, Golden, and Irresistibly Cheesy If you’re looking for a high-RPM comfort food recipe that gets clicks, saves, and repeat cooks, Cheesy Potato Patties are a guaranteed winner. Crispy on the outside, soft and fluffy on the inside, and loaded with melty cheese—this recipe checks every box readers love: easy…
-

Brown Sugar Pineapple Ham Bake 😋 – The Ultimate Sweet & Savory Comfort Dish If you’re searching for a high-RPM, comfort-food recipe that people love clicking, saving, and cooking again and again, this Brown Sugar Pineapple Ham Bake is it. Sweet, sticky brown sugar. Juicy pineapple. Tender, savory ham. Baked together into one irresistible dish…
-

Angel Chicken Pasta – The Creamy Comfort Food That Everyone Loves
Few dishes feel as comforting, indulgent, and crowd-pleasing as Angel Chicken Pasta. This creamy, slow-cooked chicken pasta recipe has earned its name because it’s truly heavenly—rich, velvety sauce, tender chicken, and perfectly cooked pasta all coming together in one unforgettable meal. Angel Chicken Pasta is one of those recipes that never goes out of style.…