There’s a moment at any great dinner table—be it a casual weeknight meal or a sprawling holiday feast—when a basket of warm, homemade rolls is passed around. That moment of silent anticipation, followed by the collective sigh of contentment as everyone bites into a pillow-soft, buttery roll, is pure magic. Yet, for many home bakers, the idea of making yeast bread from scratch is shrouded in intimidation. Visions of failed rises, tough dough, and hours of laborious kneading come to mind.
Enter the hero of homemade bread: Soft No-Knead Dinner Rolls. This revolutionary method is your golden ticket to achieving bakery-soft, cloud-like rolls with an open, tender crumb, a delicately crisp exterior, and absolutely zero stress. It’s the ultimate easy bread recipe that leverages time, not muscle, to develop incredible flavor and texture. In this comprehensive guide, we’ll demystify the simple science behind no-knead bread, provide a fail-proof recipe, and share expert tips to make these the most crowd-pleasing, make-ahead dinner rolls you’ve ever served. Prepare to become a bread-baking hero.
Why No-Knead Bread is a Game-Changer for Home Bakers
The traditional method of kneading bread dough serves one primary purpose: to develop the gluten network that gives bread its structure. The no-knead method, popularized by bakers like Jim Lahey, achieves the same result through a different, brilliantly simple path: time.
Instead of 10-15 minutes of strenuous kneading, you let a very wet, shaggy dough rest for an extended period (typically 12-18 hours). During this long, slow fermentation, two things happen:
Natural Gluten Development: Enzymes in the flour break down proteins, which then naturally align and form a strong, elastic gluten network—all on their own.
Incredible Flavor Development: The long, cold rise allows for complex fermentation flavors to develop, giving your rolls a subtle, nuanced taste that rivals artisan bakeries.
The result? Rolls that are remarkably easy, incredibly flavorful, and possess an enviably soft, airy texture that’s impossible to achieve with quick-rise methods.
The Simple Alchemy: Understanding Your Ingredients
This simple bread recipe uses humble pantry staples to create something extraordinary. Here’s the breakdown:
The Core Ingredients:
· All-Purpose Flour (3 ½ cups): The workhorse. Its moderate protein content is perfect for no-knead rolls, yielding a tender but sturdy crumb. For a slightly chewier roll, you can substitute 1 cup with bread flour.
· Instant Yeast (2 ¼ tsp / 1 packet): The tiny powerhouse. “Instant” yeast can be mixed directly into the dry ingredients, no proofing required. It’s forgiving and reliable.
· Warm Water (1 ½ cups): The hydrator. Warmth (about 105-110°F) wakes up the yeast. Too hot will kill it; too cold will stall it. It should feel like warm bath water.
· Salt (2 tsp): The flavor enhancer and regulator. Salt controls yeast activity and is absolutely crucial for taste. Never skip it.
· Sugar (2 Tbsp): The yeast’s favorite food and the tenderizer. It gives the yeast a quick boost for a good initial rise and contributes to a softer crumb and golden-brown crust.
· Unsalted Butter (¼ cup, melted): The richness factor. Butter tenderizes, adds flavor, and contributes to that irresistible softness. Using unsalted allows you to control the salt level.
The Finishing Touches:
· Additional melted butter for brushing. This gives the baked rolls their signature glossy, flavorful sheen.
The Foolproof Step-by-Step Guide to Perfect Rolls
Total Hands-On Time: 20 minutes | Total Rise Time: 2-4 hours (or overnight) | Bake Time: 20-25 minutes
Step 1: The 5-Minute Mix
In a very large bowl (the dough will expand significantly), whisk together the flour, instant yeast, sugar, and salt. Create a well in the center.
Pour in the warm water and the ¼ cup of melted butter.Stir with a sturdy wooden spoon or spatula until a shaggy, sticky, and quite wet dough forms. There should be no dry flour pockets, but don’t worry about it being smooth. This takes about 1 minute. This is the only “work” you’ll do.
Step 2: The Long, Magical Rise (The “No-Knead” Part)
Cover the bowl tightly with plastic wrap or a damp kitchen towel. Let it rest at warm room temperature (about 70-75°F) for 2-3 hours. You are looking for the dough to become puffy, bubbly, and roughly double in size. It will look alive and jiggle if you shake the bowl.
· OVERNIGHT OPTION (Recommended for Flavor): For deeper flavor, after the initial 1-hour room temperature rise, place the covered bowl in the refrigerator for 12-24 hours. When ready to shape, let it sit on the counter for 1 hour to take the chill off.
Step 3: Gentle Shaping (Handle with Care!)
Punch down the dough gently to deflate it. Turn it out onto a well-floured surface. The dough will be very soft and sticky—this is good! Use floured hands and a bench scraper to gently fold and shape it into a rough ball.
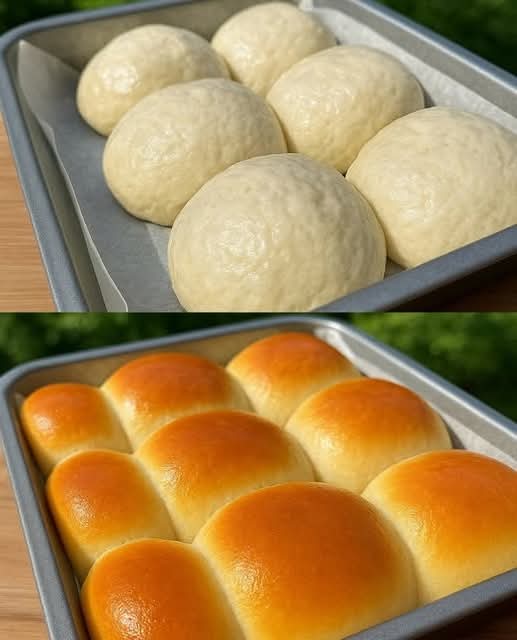
Divide the dough into 12 equal pieces(a kitchen scale is perfect for this, aiming for about 75g each). To shape each roll: cup your hand over a piece of dough and gently roll it in a tight circular motion on an unfloured part of your counter. The slight friction will help create a smooth, tight surface. Place the shaped rolls into a generously buttered 9×13-inch baking pan, spacing them evenly. They should be just touching.
Step 4: The Final Proof
Cover the pan with a clean towel and let the rolls rise again in a warm, draft-free spot for 45-60 minutes, until they are puffy and have snuggled up against each other. They won’t quite double, but they will look noticeably fuller.
Step 5: Bake to Golden Perfection
Preheat your oven to 375°F (190°C) during the last 20 minutes of the second rise.
Bake the rolls for 20-25 minutes,until the tops are a deep, golden brown and the internal temperature reads 190°F (88°C) on an instant-read thermometer.
The Pro-Tip:For an extra-soft crust, place a pan of hot water on the bottom rack of the oven while it preheats to create steam.
Step 6: The Butter Bath (The Secret to Supersoftness)
As soon as the rolls come out of the oven, brush the tops GENEROUSLY with melted butter. This keeps the crust soft and adds an incredible flavor. Let them cool in the pan for 10 minutes before serving warm.
5 Expert Tips for Flawless Rolls Every Time
Embrace the Stickiness: A wet dough is the key to an open, tender crumb. Use wet or well-floured hands when handling it; don’t be tempted to add excessive flour.
Temperature is Everything: Yeast is a living organism. A consistent, warm room temperature (not hot) is crucial for proper rising. If your kitchen is cool, let the dough rise in a turned-off oven with the light on.
The Windowpane Test (No-Knead Edition): After the long rise, you can gently stretch a small piece of dough. If it stretches thin enough to let light pass through without tearing immediately, your gluten is perfectly developed.
Use a Digital Scale: For perfectly uniform rolls and consistent results, weighing your flour and dough portions is the single best upgrade you can make to your baking.
Don’t Rush the Proof: Under-proofed rolls will be dense. Let them get truly puffy during the final rise.
Delicious Variations to Suit Every Occasion
This easy yeast bread recipe is a master formula. Customize it endlessly:
· Herb & Garlic Rolls: Add 2 tsp of dried rosemary or thyme and 3 minced garlic cloves to the dry ingredients. Brush with garlic butter after baking.
· Honey Whole Wheat Rolls: Substitute 1 ½ cups of the all-purpose flour with whole wheat flour. Replace the sugar with honey.
· Everything Bagel Rolls: After the final butter brush, dip the top of each warm roll into a mix of everything bagel seasoning.
· Cheese-Stuffed Rolls: Flatten each dough portion, place a small cube of mozzarella or cheddar in the center, and seal tightly before the final proof.
· Gluten-Free No-Knead Rolls: Use a high-quality 1:1 gluten-free flour blend (like Bob’s Red Mill) and add 1 tsp xanthan gum if your blend doesn’t contain it. The texture will be slightly different but still wonderfully soft.
FAQ: Your No-Knead Roll Questions, Answered
Q: Can I use active dry yeast instead of instant?
A:Yes. “Activate” it first: stir it into the warm water with a pinch of the sugar and let it sit for 5-10 minutes until foamy. Then proceed, adding it with the butter.
Q: My dough didn’t rise. What went wrong?
A:Likely culprits: 1) Yeast was old/dead (check expiration date), 2) Water was too hot and killed the yeast, or 3) The rising spot was too cold.
Q: Can I make these ahead of time?
A:Absolutely, they are the ultimate make-ahead dinner roll! You have two brilliant options:
- Refrigerate After Shaping: Complete through Step 3 (shaping into pan). Cover tightly and refrigerate for up to 24 hours. When ready to bake, let sit at room temp for 1 hour, then proceed with baking.
- Freeze Before Baking: Shape rolls, place on a tray to freeze solid, then transfer to a bag. The night before baking, arrange frozen rolls in pan, cover, and thaw/rise in the fridge for 12-24 hours. Let sit at room temp for 1 hour, then bake.
Q: How do I store and reheat leftovers?
A:Store cooled rolls in an airtight bag at room temp for 2 days. To restore their just-baked softness, wrap in foil and warm in a 350°F oven for 10 minutes, or microwave a single roll for 10-15 seconds. For longer storage, freeze for up to 3 months.
Q: Can I make this into a loaf?
A:Yes! After the first rise, shape into a loaf, place in a greased 9×5 loaf pan, proof until cresting the rim, and bake at 375°F for 35-45 minutes.
The Final Rise: Why This Recipe Wins
These Soft No-Knead Dinner Rolls are more than a recipe; they are an invitation to experience the quiet joy and profound satisfaction of baking bread. They remove the fear and labor, leaving only the magical parts: mixing, waiting, and the incomparable reward of pulling a pan of golden, homemade perfection from your own oven.
They prove that the best comfort food is often the simplest, and that creating a crowd-pleasing masterpiece doesn’t require advanced skills—just a little patience and trust in the process. So, mix that shaggy dough, let time do the work, and get ready to present a basket of rolls so soft, so flavorful, and so loved that they just might upstage the main course.
Recipe Card: Foolproof Soft No-Knead Dinner Rolls
Yield: 12 perfect rolls
Hands-On Time:20 minutes
Total Rise Time:3-4 hours (or 12-24 hrs overnight)
Bake Time:25 minutes
Total Time:4-5 hours (mostly hands-off)
Category:Bread, Side Dish
Method:No-Knead / Baking
Cuisine:American
Ingredients
· 3 ½ cups (440g) all-purpose flour, plus more for dusting
· 2 ¼ tsp (7g) instant yeast (1 standard packet)
· 2 Tbsp (25g) granulated sugar
· 2 tsp (12g) fine sea salt
· 1 ½ cups (360ml) warm water (105-110°F)
· ¼ cup (57g) unsalted butter, melted + more for pan and brushing
· Flaky sea salt, for garnish (optional)
Instructions
- Mix: In a large bowl, whisk flour, yeast, sugar, and salt. Add warm water and ¼ cup melted butter. Stir with a spoon until a shaggy, sticky dough forms. Cover bowl tightly.
- First Rise: Let rise at room temperature for 2-3 hours, until doubled, puffy, and bubbly.
- Shape: Punch down dough. Turn onto a floured surface. Gently shape into a ball. Divide into 12 pieces. Shape each into a smooth ball. Place in a generously buttered 9×13-inch pan.
- Second Rise: Cover pan. Let rise 45-60 mins until puffy and rolls are touching.
- Bake: Preheat oven to 375°F (190°C). Bake rolls for 20-25 mins until golden brown.
- Finish: Immediately brush tops generously with melted butter. Sprinkle with flaky salt if desired. Cool 10 minutes in pan. Serve warm.
Notes: For overnight flavor, after 1-hour room temp rise, refrigerate covered for 12-24 hours. Let sit at room temp for 1 hour before shaping. Dough will be sticky—use floured hands and a bench scraper. Store leftovers in an airtight bag. Reheat wrapped in foil in a 350°F oven.
More Recipes You Might Like
-

Cheesy Potato Patties 😋 – Crispy, Golden, and Irresistibly Cheesy If you’re looking for a high-RPM comfort food recipe that gets clicks, saves, and repeat cooks, Cheesy Potato Patties are a guaranteed winner. Crispy on the outside, soft and fluffy on the inside, and loaded with melty cheese—this recipe checks every box readers love: easy…
-

Brown Sugar Pineapple Ham Bake 😋 – The Ultimate Sweet & Savory Comfort Dish If you’re searching for a high-RPM, comfort-food recipe that people love clicking, saving, and cooking again and again, this Brown Sugar Pineapple Ham Bake is it. Sweet, sticky brown sugar. Juicy pineapple. Tender, savory ham. Baked together into one irresistible dish…
-

Angel Chicken Pasta – The Creamy Comfort Food That Everyone Loves
Few dishes feel as comforting, indulgent, and crowd-pleasing as Angel Chicken Pasta. This creamy, slow-cooked chicken pasta recipe has earned its name because it’s truly heavenly—rich, velvety sauce, tender chicken, and perfectly cooked pasta all coming together in one unforgettable meal. Angel Chicken Pasta is one of those recipes that never goes out of style.…