This classic Christmas Peanut Butter Balls recipe is a foolproof, no-bake holiday tradition! Just 4 ingredients for creamy, sweet, & irresistible treats. Perfect for gifts & cookie plates.
There’s a certain magic to holiday treats that come from the refrigerator, not the oven. Amidst the whirlwind of baking cookies, there exists a quiet, no-bake champion: the Christmas Peanut Butter Ball. Known in some parts as Buckeyes, these little orbs of creamy, sweet peanut butter enveloped in a thin, crisp coat of chocolate are more than just candy; they’re a tactile, delicious holiday memory. The process of rolling them by hand, the satisfaction of dipping them to leave that perfect peanut butter “eye,” and the sheer joy of biting into that perfect sweet-salty combination is a ritual that defines the season for countless families.
This recipe is your ticket to that tradition. It requires no special skills—just mixing, rolling, and dipping. With only four core ingredients, it’s a budget-friendly holiday treat that yields impressive results. They are the ultimate make-ahead Christmas candy, perfect for filling your freezer for last-minute guests, packaging as heartfelt homemade gifts, or simply keeping on hand for when that sweet craving strikes during a festive movie night.
Whether you’re a seasoned candy maker or a baking novice looking for a guaranteed win, these Peanut Butter Balls are your answer. They are kid-friendly, universally adored, and hold the power to turn a simple ingredient like peanut butter into a little piece of holiday bliss. Let’s create some magic that doesn’t require you to even turn on your oven.
Why This Recipe is a Hall of Fame Holiday Treat
In a season packed with complicated recipes, this one stands out for its elegant simplicity and unforgettable payoff.
· The No-Bake Superpower: When your oven is already overflowing with cookies and roasts, this recipe is a lifesaver. It’s the perfect easy holiday dessert that requires zero bake time, freeing up crucial oven space and keeping your kitchen cool.
· The Foolproof Foundation: The classic ratio of peanut butter, butter, and powdered sugar creates a dough that is forgiving and easy to work with. It’s virtually impossible to mess up, making it ideal for family baking projects with little helpers.
· Texture & Flavor Harmony: The creamy, slightly crumbly interior against the firm, snappy chocolate shell is textural perfection. The rich peanut butter flavor, perfectly sweetened and balanced with a hint of salt, makes them utterly addictive.
· The Ultimate Make-Ahead Candy: These balls freeze spectacularly. You can make them in November and have a ready-to-serve holiday treat all season long. They are the definition of stress-free holiday prep.
· A Gift from the Heart: A pretty tin or box filled with homemade peanut butter balls says “I care” more than any store-bought gift. They are a cherished edible gift that people truly remember.
Gathering Your Simple, Powerful Ingredients
The ingredient list is short, but quality matters. Using a good peanut butter is key.
The Core Dough:
· 1 ½ cups (385g) creamy peanut butter: Use a standard, shelf-stable peanut butter like Jif or Skippy. “Natural” peanut butter (the kind that separates) will make the dough too oily and soft. The stabilizers in conventional peanut butter are crucial for the right texture.
· ½ cup (1 stick / 113g) unsalted butter, softened to room temperature: This adds richness and helps bind everything.
· 1 teaspoon pure vanilla extract: For depth of flavor.
· ¼ teaspoon fine sea salt: Enhances the peanut flavor and balances the sweetness.
· 3 ½ – 4 cups (420g – 480g) powdered sugar, sifted: Sifting is important to avoid lumps. You’ll adjust the amount to get the perfect dough consistency.
For the Chocolate Coating:
· 12 ounces (about 2 cups) semi-sweet chocolate chips: High-quality chips melt and set better. You can also use dark chocolate or milk chocolate.
· 1 tablespoon refined coconut oil or shortening: This is the pro secret for a thin, smooth, snappy coating that doesn’t crack. It thins the chocolate for perfect dipping.
Ingredient Spotlight & Smart Swaps:
· The Peanut Butter Rule: This is not the time for all-natural, drippy peanut butter. The consistency of standard “processed” peanut butter is non-negotiable for a dough that holds its shape.
· Butter Temperature: Your butter must be softened (leave it out for 1-2 hours) to blend seamlessly. Don’t melt it.
· Chocolate Choices: Chocolate Almond Bark is a classic, easy-melting alternative. For a premium finish, use high-quality chocolate melting wafers.
· Add-Ins: For texture, mix in ½ cup of crushed graham crackers or finely chopped peanuts to the dough. For flavor, add a dash of cinnamon.
Step-by-Step Instructions: The Path to Perfect Dips
The process is meditative and simple. Allow yourself plenty of time for the chilling steps—they are essential.
Step 1: Create the Peanut Butter Dough.
In a large mixing bowl using a hand mixer or a sturdy wooden spoon,beat the softened butter and peanut butter together until completely smooth and creamy, about 2 minutes. Beat in the vanilla extract and salt.
Gradually add the sifted powdered sugar, about one cup at a time, mixing on low speed (or stirring vigorously) until fully incorporated. After 3 ½ cups, check the consistency. The dough should be smooth, pliable, and slightly crumbly, but hold together when pinched. It should not be sticky. If it’s too soft or sticky, add the remaining ½ cup of powdered sugar. The exact amount can vary based on your peanut butter brand and humidity.
Step 2: Roll and Chill.
Line a baking sheet with parchment or wax paper.Using a small cookie scoop (about 1 tablespoon) or your hands, roll the dough into uniform 1-inch balls. Place them on the prepared sheet. Once all the dough is rolled, place the baking sheet in the freezer for at least 30 minutes, or the refrigerator for 1-2 hours. They must be very cold and firm before dipping. This prevents them from falling apart in the warm chocolate.
Step 3: Prepare the Chocolate Coating.
When the balls are almost chilled,melt the chocolate and coconut oil together. You can do this in a double boiler (a heatproof bowl set over a pot of simmering water, not touching the water) or in the microwave in 30-second bursts, stirring vigorously after each until completely smooth. If using a double boiler, transfer the melted chocolate to a narrow, deep cup or glass for easier dipping once melted.
Step 4: The Art of the Dip.
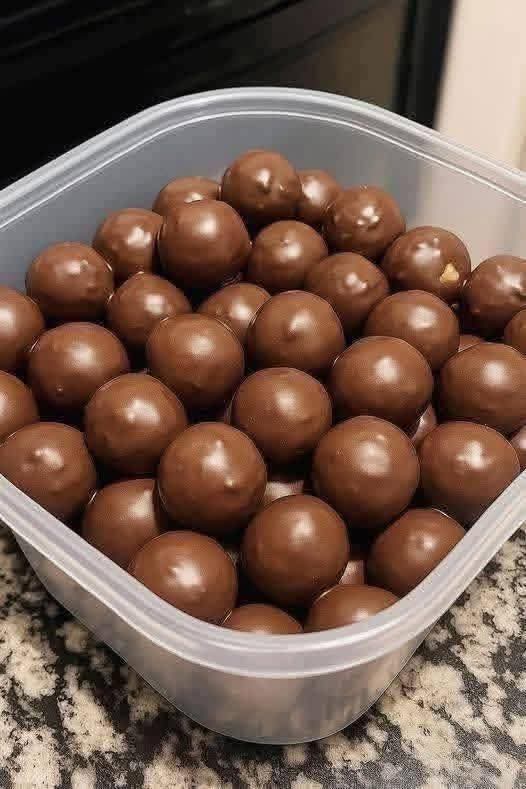
Remove only a dozen or so balls from the fridge/freezer at a time to keep them cold.Insert a toothpick into the center of a chilled ball. Dip it into the melted chocolate, leaving a small circle of peanut butter exposed at the top (to resemble a buckeye nut). Let the excess chocolate drip off, then gently place it back on the parchment-lined sheet, sliding it off the toothpick. Use a clean finger to gently smooth over the toothpick hole. If the chocolate thickens, re-warm it gently.
Step 5: Set and Store.
Once all balls are dipped,place the tray back in the refrigerator for at least 30 minutes to allow the chocolate to set completely. For a beautiful glossy finish, you can let them set at cool room temperature if your kitchen isn’t warm.
Pro Tips & Tricks for Candy-Making Success
· The “Too Sticky” Rescue: If your dough feels too soft or sticky after adding all the sugar, don’t panic. Wrap it in plastic wrap and refrigerate for 30 minutes. It will firm up significantly and be much easier to roll.
· The Double-Dip for Perfection: For a thicker, more professional-looking chocolate shell, after the first dip has fully set, you can re-melt your chocolate and give each ball a second, quick dip.
· Smooth Hole Repair: To seamlessly cover the toothpick hole, keep a small bowl of warm water nearby. After placing the dipped ball down, dip your fingertip in the water, shake it off, and gently smooth the chocolate over the hole. The water prevents the chocolate from sticking to your finger.
· Perfect for Freezing: These are a fantastic freezer-friendly treat. Once set, layer them between sheets of parchment in an airtight container. Freeze for up to 3 months. Thaw in the refrigerator.
Serving & Gifting Your Holiday Masterpiece
· The Classic Cookie Tray: These are a star on any holiday dessert charcuterie board or cookie plate, adding a different texture and flavor.
· Gift Packaging Ideas: Place them in mini paper candy cups and stack them in a decorative tin, gift box, or clear cellophane bag tied with a festive ribbon. Include a simple tag with storage instructions (“Keep refrigerated”).
· Party Serving: Pile them high on a beautiful platter or in a festive bowl for guests to enjoy.
FAQs: Your Peanut Butter Ball Questions, Answered
Q: Why did my chocolate coating crack?
A:This is usually caused by a temperature shock. If the peanut butter center is too cold and the chocolate is too hot, the contraction as it sets causes cracks. Ensure your chocolate isn’t scalding hot (just warm enough to be fluid) and let your dipped balls set at cool room temperature first before refrigerating.
Q: Can I use natural peanut butter?
A:It’s strongly discouraged for this specific recipe. The oil separation will create a greasy, soft dough that is difficult to roll and won’t hold its shape for dipping. For a natural version, you’d need a completely different recipe with different binders.
Q: How long do these last, and how should I store them?
A:Store them in a single layer or layered with parchment in an airtight container in the refrigerator for up to 2 weeks. They can be kept at cool room temperature for a few days if your home is not warm.
Q: My dough is too dry and crumbly. What can I do?
A:You may have added a bit too much powdered sugar. Work in a teaspoon of softened butter or a tiny splash of milk until it comes together.
A Final Sweet Note
Christmas Peanut Butter Balls are more than just a confection; they’re a tiny, edible emblem of holiday warmth. The act of making them—the rhythmic rolling, the careful dipping—is a quiet moment of creation in a busy season. They represent the joy of making something by hand to share with people you love.
As you place that final dipped ball on the tray, take a moment to appreciate what you’ve made: a batch of pure, simple happiness. May these little bites bring as much joy to your kitchen as they have to countless others for generations.
Did you make this recipe? Share your beautiful holiday trays! Tag your photos on social media with #ChristmasPeanutButterBalls. We love seeing your festive creations! Don’t forget to pin this recipe to your “No-Bake Treats” and “Holiday Baking” boards.
Prep Time: 45 mins | Chill Time: 1 hour | Total Time: 1 hour 45 mins | Category: Dessert, Candy | Cuisine: American | Yield: 48-60 balls
Nutritional Information (Per ball, estimated): Calories: 120, Fat: 7g, Saturated Fat: 3g, Carbohydrates: 13g, Fiber: 1g, Sugar: 11g, Protein: 2g
More Recipes You Might Like
-

Cheesy Potato Patties 😋 – Crispy, Golden, and Irresistibly Cheesy If you’re looking for a high-RPM comfort food recipe that gets clicks, saves, and repeat cooks, Cheesy Potato Patties are a guaranteed winner. Crispy on the outside, soft and fluffy on the inside, and loaded with melty cheese—this recipe checks every box readers love: easy…
-

Brown Sugar Pineapple Ham Bake 😋 – The Ultimate Sweet & Savory Comfort Dish If you’re searching for a high-RPM, comfort-food recipe that people love clicking, saving, and cooking again and again, this Brown Sugar Pineapple Ham Bake is it. Sweet, sticky brown sugar. Juicy pineapple. Tender, savory ham. Baked together into one irresistible dish…
-

Angel Chicken Pasta – The Creamy Comfort Food That Everyone Loves
Few dishes feel as comforting, indulgent, and crowd-pleasing as Angel Chicken Pasta. This creamy, slow-cooked chicken pasta recipe has earned its name because it’s truly heavenly—rich, velvety sauce, tender chicken, and perfectly cooked pasta all coming together in one unforgettable meal. Angel Chicken Pasta is one of those recipes that never goes out of style.…