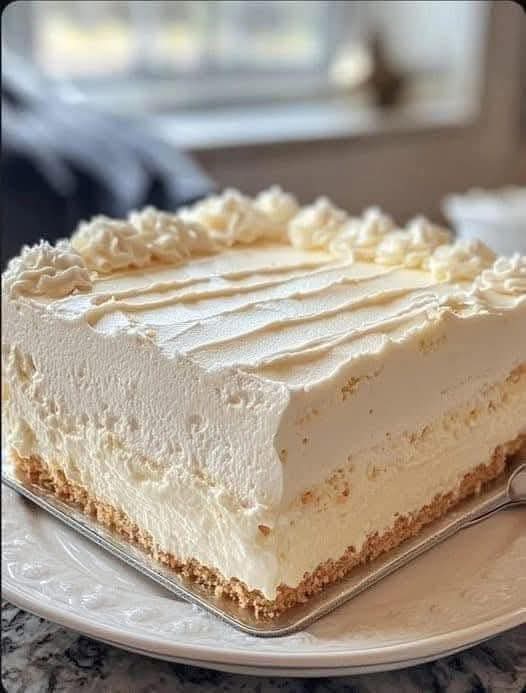
Your search for the perfect easy no-bake dessert ends here! This No-Bake Vanilla Dream Cheecake is creamy, luscious, and foolproof. No oven, no water bath, just pure vanilla bliss. The ultimate make-ahead dessert for holidays, parties, or a simple summer treat.
Imagine a dessert that captures the very essence of creamy indulgence, with a fragrance like a vanilla bean pod and a texture so light it seems to melt on your tongue, yet requires zero oven time. In a world of complicated pastries and finicky bakes, this No-Bake Vanilla Dream Cheesecake emerges as a serene, stunning triumph. It’s the dessert you confidently bring to the holiday potluck, the showstopper you effortlessly present at a dinner party, and the simple sweet treat you whip up on a warm afternoon when turning on the oven feels unthinkable.
This isn’t just a no-bake cheesecake; it’s a masterclass in texture and flavor purity. By focusing on high-quality vanilla and a perfect balance of richness and airiness, we create a dessert that feels both decadent and dreamily light. The crisp, buttery graham cracker crust provides the ideal contrast to the cloud-like filling, all topped with a shimmering vanilla glaze or a mountain of fresh berries. It’s gluten-free adaptable, incredibly kid-friendly, and the epitome of a make-ahead masterpiece that actually gets better as it chills. Let’s embark on creating a dessert that’s as relaxing to make as it is to eat.
Why This No-Bake Cheesecake Recipe is an Unbeatable Classic
What makes this specific recipe a “dream”? It’s engineered for flawless results and maximum impact with minimal effort.
· The Foolproof Stability Secret: A precise combination of cream cheese, whipped cream, and a touch of powdered sugar and gelatin (or cornstarch) guarantees a slice that holds its shape beautifully without being dense or brick-like. No soupy centers, no cracks—just perfect slices every time.
· Pure Vanilla Elevation: This recipe doesn’t hide behind heavy flavors. It celebrates vanilla in its most glorious form, using both extract and the optional seeds of a real bean to create a complex, aromatic flavor profile that is far from “plain.”
· The Ultimate Make-Ahead Advantage: Unlike its baked cousin, which can crack from temperature shock, this cheesecake is designed to be made a day (or two!) in advance. The chilling time allows the flavors to deepen and marry, making it the most stress-free dessert for entertaining imaginable.
· A Canvas for Creativity: Its elegant simplicity is its strength. Serve it pristine and glossy, or crown it with fresh summer berries, a drizzle of salted caramel, a blanket of fruit compote, or a shower of lemon zest. It adapts to any season or occasion.
Gathering Your Ingredients: The Foundation of a Dream
The magic lies in the quality of a few key components. Here’s your shopping list for vanilla heaven:
For the Buttery Crust:
· 2 cups Graham Cracker Crumbs (about 16 full sheets)
· ⅓ cup Granulated Sugar
· ½ cup (1 stick) Unsalted Butter, melted
· Pinch of Salt
For the Dreamy Vanilla Filling:
· 24 oz (three 8-oz blocks) Full-Fat Cream Cheese, softened to room temperature. This is non-negotiable for smooth blending.
· 1 ¼ cups Powdered Sugar, sifted
· 1 tablespoon Pure Vanilla Extract (use the good stuff!)
· Seeds of 1 Vanilla Bean Pod (optional, but highly recommended for those signature black specks and intense flavor)
· ⅛ teaspoon Fine Sea Salt
· 2 cups Heavy Cream, Cold
The Stabilizer (Choose One):
· 1 tablespoon Unflavored Gelatin Powder + ¼ cup Cold Water (for a firm, classic set)
· OR
· 2 tablespoons Cornstarch + 2 tablespoons Cold Milk (for a vegetarian-friendly option with a slightly softer set)
For the Simple Vanilla Glaze & Toppings:
· ½ cup Heavy Cream
· 4 oz White Chocolate, finely chopped
· 1 teaspoon Vanilla Extract
· Fresh Berries, Whipped Cream, or Fruit Compote for serving
Step-by-Step Instructions: Building Layers of No-Bake Bliss
Step 1: Create the Perfect Press-In Crust.
In a medium bowl,combine the graham cracker crumbs, sugar, and salt. Pour the melted butter over the mixture and stir until every crumb is evenly moistened and resembles wet sand. Press this mixture firmly and evenly into the bottom and slightly up the sides of a 9-inch springform pan or a deep pie dish. Use the bottom of a measuring cup to compact it. Freeze for 15-20 minutes while you make the filling.
Step 2: Prepare Your Chosen Stabilizer.
· For Gelatin: In a small microwave-safe bowl, sprinkle the gelatin over the ¼ cup cold water. Let it “bloom” for 5-10 minutes until it looks like a solid sponge. Then, microwave for 10-15 seconds until it becomes a clear liquid. Set aside to cool slightly.
· For Cornstarch: In a small saucepan, whisk the cornstarch into the 2 tablespoons of cold milk until smooth. Place over low heat, stirring constantly, until the mixture thickens to a pudding-like consistency (about 1-2 minutes). Remove from heat, scrape into a small bowl, and let cool.
Step 3: Whip the Cream to Perfect Peaks.
In a large,cold bowl, using a hand mixer or stand mixer fitted with the whisk attachment, beat the 2 cups of cold heavy cream on medium-high speed until stiff peaks form. This means when you lift the beaters, the peak stands straight up. Be careful not to over-whip into butter. Scoop the whipped cream into a separate bowl and set aside.
Step 4: Build the Luxurious Filling.
In the same mixer bowl(no need to clean it), beat the softened cream cheese on medium speed until completely smooth, about 2 minutes. Scrape down the sides. Add the sifted powdered sugar, vanilla extract, vanilla bean seeds (if using), and salt. Beat again until smooth and combined.
Step 5: The Crucial Combining Step.
With the mixer onlow speed, slowly drizzle in the slightly cooled, liquid gelatin OR the cornstarch paste. Mix just until fully incorporated. Using a large rubber spatula, gently fold in the reserved whipped cream in two or three additions. Fold until no white streaks remain, being careful not to deflate the air you’ve whipped in. The mixture will be thick, creamy, and dreamily cloud-like.
Step 6: Assemble & Chill to Set.
Retrieve your crust from the freezer.Spoon the filling into the crust, smoothing the top with an offset spatula. Tap the pan gently on the counter to release any air bubbles. Cover loosely with plastic wrap and refrigerate for at least 6 hours, but ideally overnight, for a perfect, sliceable set.
Step 7: Make the Optional Glaze & Finalize.
For the glaze,heat the ½ cup heavy cream in a small saucepan until just simmering. Place the chopped white chocolate in a bowl. Pour the hot cream over the chocolate, let it sit for 2 minutes, then add the vanilla extract and whisk until smooth. Let cool for 5-10 minutes until slightly thickened but still pourable. Pour over the chilled cheesecake, allowing it to drip slightly down the sides. Return to the fridge for 30 minutes to set the glaze. Before serving, release the springform pan and adorn with fresh berries.
Serving & Presentation: The Grand Finale
This cheesecake is elegance personified.
· The Classic Slice: Serve a clean wedge on a dessert plate, perhaps with a dollop of extra whipped cream and a single perfect strawberry.
· Berry Fest: Create a stunning summer dessert by piling high with mixed berries, raspberry coulis, and mint sprigs.
· Salted Caramel Drizzle: For a sweet-salty twist, forego the glaze and drizzle with salted caramel sauce and a sprinkle of flaky sea salt.
· Individual Portions: Set small glasses or jars with crumbled crust, piped filling, and toppings for easy party desserts.
Pro Tips, Variations & Troubleshooting for Flawless Results
· Room Temperature is KEY: Ensure your cream cheese is truly softened. Cold cream cheese will leave lumps no matter how long you mix.
· Avoid Overmixing the Filling: Once you add the whipped cream, fold gently. Overmixing deflates the air, leading to a denser texture.
· No Springform Pan? A 9-inch deep-dish pie plate works. For serving, slice directly from the pan.
· Gluten-Free & Dietary Twists: Use gluten-free graham crackers. For a lower-sugar option, you can reduce powdered sugar by ¼ cup and use a sugar substitute formulated for baking. The gelatin is not vegetarian; use the cornstarch option.
· Flavor Variations:
· Lemon Dream: Add 2 tbsp lemon zest and 2 tbsp lemon juice to the filling, omitting vanilla bean.
· Berry Swirl: Before chilling, dollop ½ cup of seedless raspberry jam on the filling and swirl with a knife.
· Chocolate Crust: Use chocolate wafer cookies for the base.
· Storage: Keep covered in the refrigerator for up to 5 days. It freezes beautifully for up to 2 months. Thaw overnight in the fridge.
Frequently Asked Questions (FAQ)
Q: My filling is too soft. What went wrong?
A:The most common culprits are: 1) Not chilling long enough (overnight is best), 2) Under-whipped heavy cream, 3) The stabilizer (gelatin/cornstarch) was not properly prepared or incorporated when too hot, or 4) The cream cheese was too warm when mixed, softening the whipped cream.
Q: Can I use an electric hand mixer instead of a stand mixer?
A:Absolutely! An electric hand mixer works perfectly for both the whipped cream and cream cheese steps. Just ensure you have a large enough bowl for the whipped cream.
Q: Is there a substitute for heavy cream?
A:For the structure of the filling, heavy cream (with its high fat content) is essential. Substitutes like milk or half-and-half will not whip properly and will result in a runny filling. For the glaze, full-fat coconut cream can replace heavy cream for a dairy-free version.
Q: Why did my crust get soggy?
A:This happens if the filling is too warm when added, or if the cheesecake isn’t eaten within a few days. Ensure your filling is cool (from the gelatin/milk mixture) before folding in whipped cream, and always press the crust in firmly and freeze it first to create a moisture barrier.
Conclusion: The Dream Dessert, Realized
The No-Bake Vanilla Dream Cheesecake is more than just a recipe; it’s a promise of delicious simplicity. It proves that the most impressive desserts don’t require complex techniques or a hot oven—they require good ingredients, a bit of patience for chilling, and the intention to create something joyful. It’s a dessert that listens to the season, welcomes your personal touch, and consistently delivers a moment of pure, creamy delight.
So, the next time you need a dessert that feels both special and stress-free, remember this dream in a springform pan. It’s waiting to become the quiet star of your table, the recipe friends will ask for, and your secret weapon for effortless entertaining.
We can’t wait for you to try it! Share your beautiful creations and tag them with #VanillaDreamCheesecake. For more no-bake desserts and easy entertaining ideas, explore our full collection of sweet guides. Happy, chill baking
More Recipes You Might Like
-

Cheesy Potato Patties 😋 – Crispy, Golden, and Irresistibly Cheesy If you’re looking for a high-RPM comfort food recipe that gets clicks, saves, and repeat cooks, Cheesy Potato Patties are a guaranteed winner. Crispy on the outside, soft and fluffy on the inside, and loaded with melty cheese—this recipe checks every box readers love: easy…
-

Brown Sugar Pineapple Ham Bake 😋 – The Ultimate Sweet & Savory Comfort Dish If you’re searching for a high-RPM, comfort-food recipe that people love clicking, saving, and cooking again and again, this Brown Sugar Pineapple Ham Bake is it. Sweet, sticky brown sugar. Juicy pineapple. Tender, savory ham. Baked together into one irresistible dish…
-

Angel Chicken Pasta – The Creamy Comfort Food That Everyone Loves
Few dishes feel as comforting, indulgent, and crowd-pleasing as Angel Chicken Pasta. This creamy, slow-cooked chicken pasta recipe has earned its name because it’s truly heavenly—rich, velvety sauce, tender chicken, and perfectly cooked pasta all coming together in one unforgettable meal. Angel Chicken Pasta is one of those recipes that never goes out of style.…