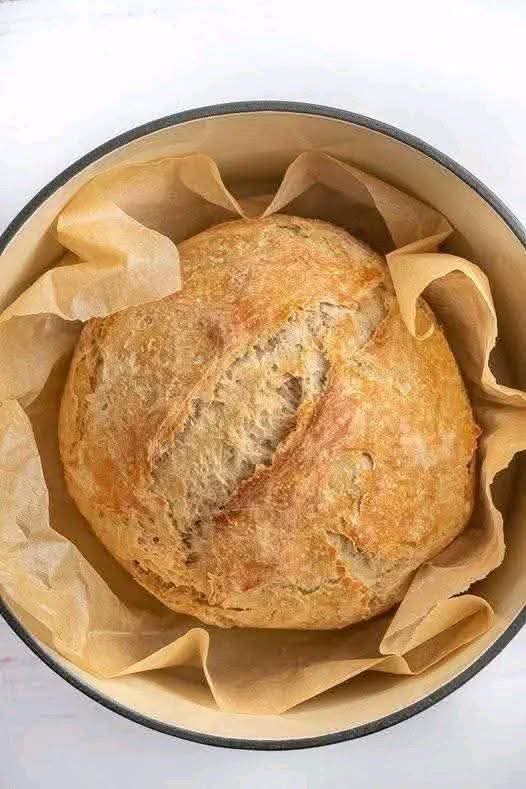
There are few things in life as profoundly satisfying as pulling a loaf of homemade white bread from your oven. The aroma that floods your kitchen—yeasty, warm, and comforting—is the scent of love, patience, and simple culinary magic. That first slice, still warm, with a smear of melting butter, is a taste of pure, unadulterated joy. Forget the preservative-filled, spongy loaves from the supermarket. This is real bread: a beautiful, golden-brown loaf with a crispy, crackly crust and a soft, pillowy, tender crumb that’s perfect for sandwiches, toast, or just eating plain.
Making your own bread might seem intimidating, but this foolproof, beginner-friendly recipe is designed to demystify the process. With clear instructions, explanations of the “why” behind each step, and a focus on technique over mystery, you’ll discover that baking bread is not just doable—it’s deeply rewarding. This is your gateway to the world of homemade artisan baking, a basic bread recipe you’ll return to again and again. Let’s roll up our sleeves and create a loaf that will transform your kitchen into a bakery.
Why This Homemade White Bread Recipe is a Game-Changer
This recipe is engineered for success, delivering a classic, versatile loaf with minimal fuss.
· Foolproof for Beginners: With detailed, step-by-step instructions and explanations of key stages (like proofing and kneading), this recipe builds your confidence and skills. It’s the perfect first bread recipe.
· Simple, Accessible Ingredients: You likely have everything you need in your pantry right now: flour, water, yeast, salt, sugar, and a bit of fat. No special equipment required.
· Superior Taste & Texture: The flavor of fresh yeast, the slight sweetness, and the incredible contrast between the crisp crust and soft interior are miles ahead of any store-bought loaf. It’s the definition of comfort food baking.
· The Ultimate Blank Canvas: Master this basic white bread, and you can create endless variations: add herbs, cheese, seeds, or turn it into cinnamon rolls or pizza dough. It’s a foundational baking skill.
· Cost-Effective & Rewarding: For pennies on the dollar, you get a high-quality loaf and the immense pride of saying, “I made this.”
The Beautiful Science of Bread: How Four Ingredients Transform
Understanding the basic process makes you a better, more intuitive baker. Bread is alchemy.
Flour (The Structure): Wheat flour contains two key proteins: gliadin and glutenin. When mixed with water, they form gluten. Kneading develops this gluten into a strong, elastic network that traps gas and gives bread its structure and chew.
Yeast (The Lifeforce): These living microorganisms feast on the sugars in the flour (and any added sugar). They produce carbon dioxide gas (which gets trapped in the gluten network, causing the bread to rise) and alcohol (which contributes flavor).
Water (The Activator): Water hydrates the flour, allowing gluten to form. The temperature of the water is crucial—too hot kills the yeast, too cold slows it down. Lukewarm is the sweet spot.
Salt (The Flavor & Regulator): Salt strengthens the gluten network, controls the yeast’s activity so it doesn’t go wild, and is absolutely essential for flavor. Never skip it.
Perfect Homemade White Bread Loaf
Prep Time: 20 minutes (active)
Rise Time:1.5 – 2 hours
Bake Time:30-35 minutes
Total Time:About 2.5 – 3 hours
Yield:1 beautiful 9×5-inch loaf
Difficulty:Easy/Intermediate
Ingredients:
· 1 cup (240ml) warm water (about 105-110°F / 40-43°C)
· 2 ¼ teaspoons (1 standard packet) active dry yeast
· 2 tablespoons (25g) granulated sugar, divided
· 3 cups (360g) bread flour (or all-purpose flour), plus more for dusting*
· 1 ½ teaspoons fine sea salt
· 2 tablespoons (28g) unsalted butter or vegetable oil, at room temperature, plus more for greasing
Flour Note: Bread flour has a higher protein content (12-14%) than all-purpose (10-12%), leading to a chewier, taller loaf with better structure. All-purpose flour will yield a slightly more tender, but still excellent, loaf.
Equipment:
· Stand mixer with dough hook (optional but helpful)
· Large mixing bowl
· 9×5 inch loaf pan
· Kitchen towel or plastic wrap
· Instant-read thermometer (optional but useful)
Step-by-Step Instructions:
Part 1: Activate the Yeast (The “Proof”).
In a small bowl or liquid measuring cup,combine the warm water, yeast, and 1 tablespoon of the sugar. Stir gently and let it sit for 5-10 minutes. It should become foamy, creamy, and puffy—this “bloom” proves your yeast is alive and active. If nothing happens, your yeast may be old; start over with a fresh packet.
Part 2: Make the Dough.
In the bowl of a stand mixer (or a large mixing bowl), whisk together the flour, remaining 1 tablespoon of sugar, and salt.
Make a well in the center. Pour in the yeasty water and add the room-temperature butter or oil.
If using a stand mixer: Fit with the dough hook. Mix on low speed until a shaggy dough forms, then increase to medium speed and knead for 8-10 minutes.
If kneading by hand: Stir with a wooden spoon until it becomes too difficult, then turn out onto a lightly floured surface. Knead for 10-15 minutes.
The Goal: You want a smooth, slightly tacky (but not sticky) dough that springs back slowly when you poke it with a floured finger. This is the “windowpane test”: take a small piece of dough and gently stretch it. If you can stretch it thin enough to see light through it without it tearing, your gluten is perfectly developed.
Part 3: The First Rise (Bulk Fermentation).
Shape the dough into a smooth ball. Lightly grease a clean large bowl with oil or butter.
Place the dough ball in the bowl, turning it once to coat lightly in oil. This prevents a dry skin from forming.
Cover the bowl tightly with a damp kitchen towel or plastic wrap. Place it in a warm, draft-free spot (like a turned-off oven with the light on).
Let it rise for 1 to 1.5 hours, or until it has doubled in size. This timing can vary with room temperature.
Part 4: Shape the Loaf.
Gently punch down the risen dough to release the large air bubbles. Turn it out onto a lightly floured surface.
Flatten it slightly into a rectangle, about 9 inches long. Tightly roll the dough up from the short end, like a jelly roll, pinching the seam closed with your fingers. Pinch the ends and tuck them under.
Place the shaped loaf, seam-side down, into a greased 9×5 inch loaf pan.
Part 5: The Second Rise (Proofing).
Cover the loaf pan with the towel or plastic wrap.Let it rise again in a warm place for 45-60 minutes, or until the dough has risen about 1 inch above the rim of the pan. It should look puffy and airy.
Part 6: Bake to Golden Perfection.
While the dough proofs, preheat your oven to 375°F (190°C). Place a rack in the center position.
Optional for a Shinier Crust: Just before baking, brush the top of the loaf with an egg wash (1 egg beaten with 1 tbsp water) or milk.
Bake for 30-35 minutes. The bread is done when it is a deep, golden brown, sounds hollow when tapped on the bottom, and the internal temperature registers 190-200°F (88-93°C) on an instant-read thermometer.
Crucial Step: Immediately remove the loaf from the pan and place it on a wire rack to cool completely. This prevents the bottom from steaming and becoming soggy. Resist slicing for at least 1 hour! Cutting into a hot loaf releases steam and results in a gummy texture.
Pro Tips for Bread-Baking Brilliance
· Measure Your Flour Correctly: The #1 mistake in baking is using too much flour. For accuracy, use a kitchen scale. If using cups, fluff your flour with a spoon, spoon it lightly into the cup, and level it off with a knife. Don’t scoop directly from the bag.
· The Perfect Dough Feel: It’s better for your dough to be a little too sticky than too dry. You can always add a sprinkle of flour while kneading, but you can’t add water once it’s dry and tough.
· Patience with Rising: Don’t rush the rises. The yeast needs time to develop flavor. If your kitchen is cool, the rise will just take longer. The dough is ready when it’s doubled in size, not when the timer goes off.
· Creating Steam for a Crispier Crust (Advanced Tip): For a professional, crackly crust, place a metal pan on the bottom rack of your oven while preheating. When you load the bread, toss a handful of ice cubes into the hot pan and quickly close the oven door. The steam helps the crust expand and caramelize.
· Slashing the Top: Just before baking, use a very sharp knife or razor blade (lame) to make a ½-inch deep slash down the center of the loaf. This “score” gives the bread a controlled place to expand, preventing ugly tearing and giving it that classic artisan look.
Flavor Variations & Adaptations
· Buttermilk Bread: Replace the water with warm buttermilk for an incredibly tender, slightly tangy crumb.
· Honey Whole Wheat: Substitute 1 cup of bread flour with whole wheat flour and replace the sugar with honey.
· Everything Bagel Bread: After the egg wash, sprinkle the top generously with everything bagel seasoning before baking.
· Herb & Garlic: Knead in 2 tbsp of chopped fresh herbs (rosemary, thyme) and 1 tsp of garlic powder with the flour.
· Cheese & Jalapeño: Knead in 1 cup of shredded cheddar cheese and ¼ cup of finely diced jalapeños after the first rise.
Storing, Freezing & Reheating
Storing: Once completely cool, store in a bread bag or airtight container at room temperature for up to 4 days. Do not refrigerate, as it accelerates staling.
Freezing for Longevity: This bread freezes beautifully. Wrap the cooled loaf (or slices) tightly in plastic wrap, then foil, and freeze for up to 3 months. Thaw at room temperature or toast directly from frozen.
Reheating for Best Results: To revive day-old bread, sprinkle the loaf or slice with a little water and warm in a 300°F oven for 5-10 minutes. For a single slice, toasting is always best.
Frequently Asked Questions (FAQs)
Q: Can I use instant yeast instead of active dry?
A: Yes!Instant yeast can be mixed directly into the dry ingredients. Use the same amount. You can skip the “proofing” in water step, though ensuring your liquid is the right temperature is still important.
Q: My bread is dense and didn’t rise much. What happened?
A:This is usually due to one of three things: 1) Old or dead yeast (always proof it first), 2) Water that was too hot and killed the yeast, or 3) Over-flouring the dough, making it too heavy to rise properly.
Q: Why did my bread collapse or have huge holes inside?
A:This typically means it over-proofed (rose for too long). The gluten structure becomes over-stretched and weak, then collapses in the oven’s heat. Stick to the visual cue (doubled in size) rather than a strict time.
Q: Can I make this dough in a bread machine?
A:Absolutely. Add the ingredients in the order recommended by your machine’s manual (usually liquids first, then dry, yeast last). Use the “dough” cycle, then shape, proof, and bake in your oven as directed.
Q: My crust is too hard/too soft. How can I control it?
A:For a softer crust, brush the baked loaf with melted butter as soon as it comes out of the oven, then tent it with foil while it cools. For a crispier crust, don’t brush with butter and let it cool uncovered. Use the steam trick mentioned in the Pro Tips.
Conclusion: The Simple, Soulful Act of Baking Bread
Baking homemade white bread is more than a recipe—it’s a practice. It connects you to centuries of tradition, teaches patience, and rewards you with something tangible and nourishing. The rhythmic kneading can be meditative, the wait builds anticipation, and the final product is a testament to your own capability.
So, take a deep breath, trust the process, and begin. Your first warm slice, slathered in butter, will be more than just bread. It will be a triumph, a comfort, and the start of a beautiful, flour-dusted journey in your own kitchen.
Have you baked bread before? What’s your biggest bread-baking challenge or triumph? Share your stories and questions in the comments below!
More Recipes You Might Like
-

Cheesy Potato Patties 😋 – Crispy, Golden, and Irresistibly Cheesy If you’re looking for a high-RPM comfort food recipe that gets clicks, saves, and repeat cooks, Cheesy Potato Patties are a guaranteed winner. Crispy on the outside, soft and fluffy on the inside, and loaded with melty cheese—this recipe checks every box readers love: easy…
-

Brown Sugar Pineapple Ham Bake 😋 – The Ultimate Sweet & Savory Comfort Dish If you’re searching for a high-RPM, comfort-food recipe that people love clicking, saving, and cooking again and again, this Brown Sugar Pineapple Ham Bake is it. Sweet, sticky brown sugar. Juicy pineapple. Tender, savory ham. Baked together into one irresistible dish…
-

Angel Chicken Pasta – The Creamy Comfort Food That Everyone Loves
Few dishes feel as comforting, indulgent, and crowd-pleasing as Angel Chicken Pasta. This creamy, slow-cooked chicken pasta recipe has earned its name because it’s truly heavenly—rich, velvety sauce, tender chicken, and perfectly cooked pasta all coming together in one unforgettable meal. Angel Chicken Pasta is one of those recipes that never goes out of style.…