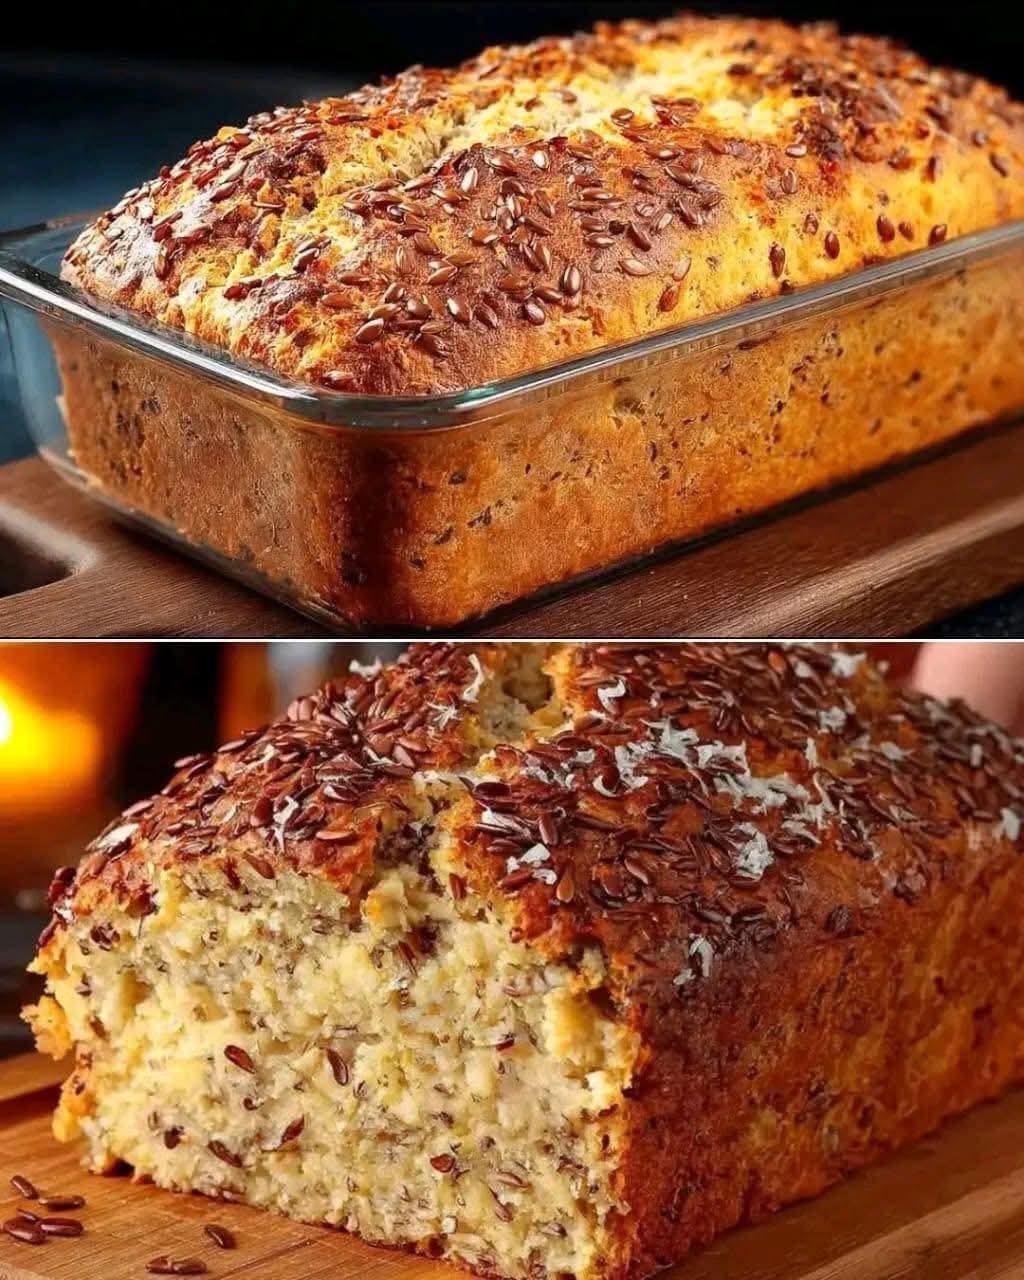
There is a singular, soul-satisfying magic to pulling a loaf of bread from your own oven. The crackle of the crust as it cools, the warm, nutty aroma that fills your kitchen, the promise of that first slice—these are the quiet rewards of baking. This Wholesome Seeded Harvest Loaf is that magic, perfected. It’s not just bread; it’s a textural symphony. Imagine a soft, moist, and generously textured crumb, offering a slightly sweet, nutty depth in every bite, all encased in a thin, golden crust crowned with a confetti of crunchy seeds. This is the ultimate homemade artisan bread that requires no special skills, just a little time and care. It’s the nutritious, delicious cornerstone for breakfast toast, the perfect companion to soups and salads, and a testament to the fact that the best things are often the simplest, made by hand.
The Anatomy of a Perfect Wholesome Loaf
What separates a good homemade loaf from a truly great one? It’s a harmony of elements:
· A Soft, Moist Crumb: Achieved through a balanced hydration and the inclusion of wholesome fats and sweeteners that retain moisture for days.
· Complex Texture & Flavor: Created by using a blend of flours and whole grains, offering a satisfying chew and nutty undertones.
· A Golden, Crisp-Tender Crust: The result of a hot oven and a steamy baking environment that gives way to a delicate, shattering bite.
· The Nutritious Seed Crown: A mix of seeds adds crunch, visual appeal, and a powerhouse of nutrients, healthy fats, and fiber.
This recipe is engineered to deliver all four, consistently, turning your kitchen into a personal artisan bakery.
Wholesome Seeded Harvest Loaf: The Complete Recipe
Prep Time: 25 minutes (plus mixing) | Rise Time: 1.5 – 2 hours | Bake Time: 35-40 minutes | Total Time: ~3 hours | Yield: 1 glorious loaf
Ingredients:
For the Bread Dough:
· 2 ¼ teaspoons (1 packet / 7g) active dry yeast
· 1 ¼ cups (300ml) warm water (105-115°F / 40-46°C)
· 2 tablespoons honey or pure maple syrup
· 2 tablespoons olive oil or melted coconut oil, plus more for bowl
· 1 ½ teaspoons fine sea salt
· 2 cups (250g) bread flour or all-purpose flour
· 1 ½ cups (180g) whole wheat flour
· ½ cup (60g) old-fashioned rolled oats (plus 2 tbsp for topping)
· ¼ cup (30g) sunflower seeds
· ¼ cup (30g) pumpkin seeds (pepitas)
For the Seed Soaker & Topping:
· 2 tablespoons mixed seeds (such as flax, sesame, and more sunflower/pumpkin)
· ¼ cup (60ml) boiling water
· 1 tablespoon rolled oats (from the amount above)
· 1 egg white, lightly beaten with 1 tsp water (for egg wash)
· Coarse sea salt, for sprinkling (optional)
Step-by-Step Instructions:
Part 1: Make the Seed Soaker (Do this first!)
In a small bowl, combine the 2 tablespoons of mixed seeds and 1 tablespoon of rolled oats. Pour the ¼ cup of boiling water over them, stir, and set aside. This “soaker” will gel and thicken, adding incredible moisture and binding the topping to the crust.
Part 2: Make the Dough
Activate the Yeast: In the bowl of a stand mixer or a large mixing bowl, whisk the warm water, honey/maple syrup, and yeast together. Let it sit for 5-10 minutes until foamy and creamy.
Mix the Dough: Add the oil, salt, whole wheat flour, 1 cup of the bread flour, and the soaked seed mixture (including all its water) to the yeast mixture. Stir with a dough hook or wooden spoon until a shaggy dough forms.
Knead: If using a stand mixer, fit it with the dough hook. Add the remaining bread flour ¼ cup at a time, kneading on medium-low speed for 7-8 minutes until the dough is soft, slightly tacky, but smooth and elastic. It should clear the sides of the bowl but may stick slightly to the bottom. Alternatively, turn the dough onto a floured surface and knead by hand for 10 minutes.
Incorporate Seeds & Oats: In the last minute of kneading, add the ½ cup of rolled oats, sunflower seeds, and pumpkin seeds. Knead just until evenly distributed.
Part 3: First Rise & Shape
First Rise: Place the dough in a lightly oiled bowl, turning to coat. Cover with a damp kitchen towel or plastic wrap. Let rise in a warm, draft-free place for 1 to 1.5 hours, or until nearly doubled in size.
Shape the Loaf: Gently deflate the dough. Turn it out onto a lightly floured surface. Shape it into a tight oval or round loaf by pulling the edges down and pinching them together at the bottom. Place the loaf, seam-side down, on a parchment-lined baking sheet or into a greased 9×5 inch loaf pan.
Part 4: Second Rise & Preheat
Second Rise: Cover the shaped loaf again and let it rise for 30-45 minutes, until puffy. Meanwhile, preheat your oven to 375°F (190°C). Place an empty metal pan (like a baking dish) on the bottom rack.
Score & Top: Just before baking, brush the entire loaf gently with the egg wash. Sprinkle the remaining 1 tablespoon of oats and extra seeds generously over the top. Using a sharp razor blade or lame, make one long, deep slash (about ½-inch deep) down the center of the loaf. This controls expansion and gives it a professional look. Sprinkle with a little coarse salt if desired.
Part 5: Bake to Perfection
Create Steam: Just before you put the bread in the oven, carefully pour 1 cup of hot water into the preheated empty pan on the bottom rack. Close the oven door immediately. The steam is crucial for a golden, crisp crust.
Bake: Bake the loaf for 35-40 minutes. It is done when the crust is a deep, golden brown, the loaf sounds hollow when tapped on the bottom, and an internal thermometer reads 190-200°F (88-93°C).
Cool Completely: This is the hardest but most important step. Transfer the loaf to a wire rack and let it cool completely (at least 2 hours) before slicing. Slicing too soon releases steam and makes the crumb gummy.
Baker’s Pro-Tips for Loaf Success
· Flour Power: The combination of bread flour (higher protein for structure) and whole wheat flour (for flavor and nutrition) is ideal. You can use all all-purpose flour in a pinch, but the texture will be more tender and less chewy.
· Hydration is Key: This is a slightly sticky dough, which is what creates a moist crumb. Resist the urge to add too much extra flour during kneading; use wet hands or a bench scraper to handle it.
· The Steam Secret: The steam in the oven keeps the crust soft initially, allowing the loaf to achieve maximum “oven spring” (rise) before setting into a crisp, golden shell. Don’t skip it.
· Seed Flexibility: Use any seeds you love! A tablespoon of whole flax or chia seeds in the dough adds great nutrition. For the topping, everything bagel seasoning is a delicious shortcut.
· Testing for Doneness: The internal temperature is your most reliable guide. A hollow sound can sometimes be deceptive if the crust is very thick.
Serving & Storing Your Masterpiece
· Serving: This bread is sublime simply sliced and slathered with good butter, avocado, or almond butter. It makes exceptional toast and is the perfect hearty base for open-faced sandwiches or eggs.
· Storing: Once completely cool, store at room temperature in a bread bag or wrapped in beeswax wrap for up to 3 days. The crust will soften, which is natural.
· Freezing: For longer storage, slice the cooled loaf, place parchment between slices, and freeze in a zip-top bag for up to 3 months. Toast slices directly from frozen.
Frequently Asked Questions (FAQ)
Q: Can I make this by hand without a stand mixer?
A: Absolutely.Follow the same steps, mixing with a wooden spoon and then kneading on a floured surface for a full 10 minutes until smooth and elastic.
Q: My dough didn’t rise much. What happened?
A:Likely culprit is old yeast (always test it) or water that was too hot and killed the yeast. The environment could also be too cold. Ensure your rising spot is warm (on top of the fridge or in a turned-off oven with the light on).
Q: Can I use all whole wheat flour?
A:You can, but the loaf will be denser and less moist. For a 100% whole wheat version, increase the water by 2-3 tablespoons and consider adding 1-2 tablespoons of vital wheat gluten to improve rise.
Q: Why is my bread dense and gummy?
A:The most common reasons are: 1) slicing while still warm, 2) not baking long enough (use that thermometer!), or 3) using too much flour during kneading, creating a dry, tight dough.
Q: Is this a sourdough bread?
A:No, this is a yeasted bread. For a sourdough version, you would need to maintain a starter and use a different process with a much longer fermentation.
The Final Slice: The Reward of Patience
Baking this Wholesome Seeded Harvest Loaf is an act of nurturing—for yourself and for those you share it with. It connects you to a fundamental, timeless rhythm of the kitchen. The process is simple, but the result feels profoundly artisan.
As you slice into that cooled loaf, revealing the soft, seeded interior and hearing the crunch of the crust, you’ll understand. This is more than bread; it’s nourishment, accomplishment, and love, baked into one perfect, golden form.
We’d love to see your beautiful bakes! Did you use a special seed blend? How did your family enjoy it? Share your photos and experiences in the comments below.
P.S. Know a friend who’s been wanting to try baking bread? Share this guide with them! And for more heartfelt, from-scratch recipes, subscribe to get our latest kitchen projects delivered straight to your inbox. Happy baking
More Recipes You Might Like
-

Cheesy Potato Patties 😋 – Crispy, Golden, and Irresistibly Cheesy If you’re looking for a high-RPM comfort food recipe that gets clicks, saves, and repeat cooks, Cheesy Potato Patties are a guaranteed winner. Crispy on the outside, soft and fluffy on the inside, and loaded with melty cheese—this recipe checks every box readers love: easy…
-

Brown Sugar Pineapple Ham Bake 😋 – The Ultimate Sweet & Savory Comfort Dish If you’re searching for a high-RPM, comfort-food recipe that people love clicking, saving, and cooking again and again, this Brown Sugar Pineapple Ham Bake is it. Sweet, sticky brown sugar. Juicy pineapple. Tender, savory ham. Baked together into one irresistible dish…
-

Angel Chicken Pasta – The Creamy Comfort Food That Everyone Loves
Few dishes feel as comforting, indulgent, and crowd-pleasing as Angel Chicken Pasta. This creamy, slow-cooked chicken pasta recipe has earned its name because it’s truly heavenly—rich, velvety sauce, tender chicken, and perfectly cooked pasta all coming together in one unforgettable meal. Angel Chicken Pasta is one of those recipes that never goes out of style.…