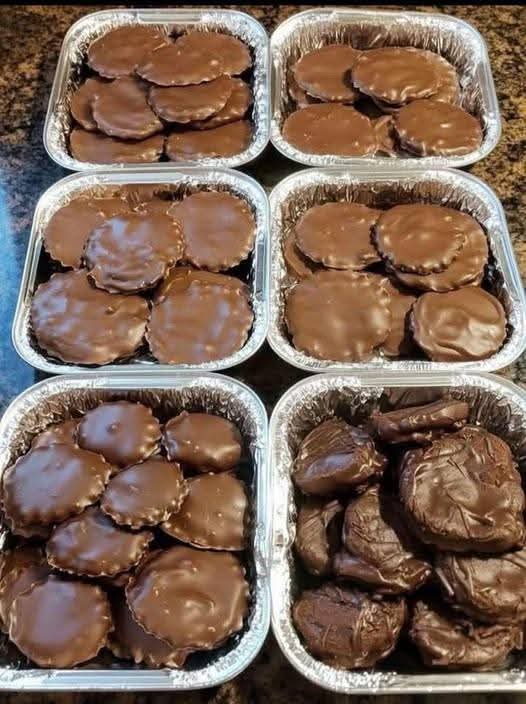
There is a particular alchemy that occurs when three simple ingredients—toasted pecans, rich caramel, and smooth chocolate—come together in perfect harmony. The result is not just a confection; it’s an experience. This is Turtle Candy, the iconic treat that has defined homemade candy boxes, holiday platters, and gourmet gift-giving for generations. With its whimsical, lumpy shape resembling its namesake reptile, each piece delivers a sublime textural journey: the buttery crunch of pecans, the chewy, salty-sweet pull of caramel, and the luscious snap of dark chocolate.
More than just a recipe, making turtles is a beloved holiday tradition, a foray into the world of homemade candy making that feels impressively artisan yet is deceptively simple. Unlike finicky fudge or temperamental toffee, turtles are forgiving and fun to make, requiring no candy thermometer for the easiest versions. They are the ultimate make-ahead holiday candy, perfect for gifting, plating on a dessert board, or hiding away for a secret, indulgent moment. This guide will walk you through creating both classic and foolproof versions of this legendary treat.
The Sweet History of a Classic Confection
The story of turtle candy is as rich as its flavor. While the exact origin is debated, it’s widely believed they were first created in the early 20th century by a candy wholesaler who, struck by the shape created when caramel covered a cluster of pecons, exclaimed that they looked like turtles. The name stuck. For decades, they were a staple of Southern and Midwestern candy kitchens, often made with a distinctively buttery, soft caramel that contrasts beautifully with the chocolate shell. Today, they represent the gold standard of gourmet homemade gifts and a timeless piece of American confectionery nostalgia.
Classic vs. Easy: Two Paths to Turtle Perfection
We’ll explore two primary methods: the Classic Stovetop Caramel Turtle, which delivers that authentic, chewy-pull caramel, and the Quick & Foolproof Turtle, which uses pre-made caramel for infallible results. Both are magnificent.
Method 1: The Classic Stovetop Caramel Turtle
This method yields the most authentic, deeply flavorful caramel with that perfect chew.
Prep Time: 30 min | Cook Time: 15 min | Setting Time: 1 hour | Total Time: ~1 hour 45 min | Yield: 30-36 turtles
Ingredients:
· For the Pecan Clusters:
· 3 cups (about 300g) pecan halves
· For the Homemade Caramel:
· 1 cup (2 sticks / 225g) unsalted butter
· 1 lb (454g) light brown sugar, packed
· 1 (14 oz) can sweetened condensed milk
· 1 cup (240ml) light corn syrup
· 1 teaspoon pure vanilla extract
· ½ teaspoon fine sea salt
· For the Chocolate Coating:
· 12 oz (340g) high-quality semi-sweet or dark chocolate chips or bars, finely chopped
· 1 tablespoon coconut oil or shortening (optional, for shine and smoothness)
· For Topping (Optional):
· Flaky sea salt
Instructions:
Prep: Line two large baking sheets with parchment paper. Create clusters of 3-4 pecan halves in a star shape, making sure they touch in the center. This is your turtle “body.”
Toast the Pecans (Highly Recommended): Preheat oven to 350°F (175°C). Spread pecans on a sheet and toast for 7-8 minutes until fragrant. Let cool. This intensifies their flavor dramatically.
Make the Caramel: In a heavy-bottomed, large saucepan (at least 4 quarts), combine butter, brown sugar, condensed milk, and corn syrup. Cook over medium heat, stirring constantly with a heat-resistant spatula, until the butter is melted and sugar is dissolved.
Attend the Caramel: Attach a candy thermometer to the pot. Continue cooking, stirring frequently to prevent scorching, until the mixture reaches 245°F (118°C), the firm-ball stage. This will take 10-15 minutes. Immediately remove from heat and stir in vanilla and salt.
Cluster the Turtles: Working quickly but carefully (caramel is extremely hot!), spoon a heaping tablespoon of caramel over the center of each pecan cluster, allowing it to pool and adhere to the nuts. Let cool completely until the caramel is firm, about 30-60 minutes.
Temper the Chocolate (For a Professional Snap & Shine): Melt 2/3 of the chocolate in a double boiler or microwave in 30-second bursts, stirring until smooth. Remove from heat and stir in the remaining 1/3 of the chocolate until melted. This “seeding” method tempers the chocolate. Stir in coconut oil if using.
Dip and Finish: Using a fork or dipping tool, dip each caramel cluster into the chocolate, let excess drip off, and return to parchment. Immediately sprinkle with a pinch of flaky sea salt if desired. Let set at room temperature until firm, or refrigerate for 15 minutes.
Method 2: The Quick & Foolproof Turtle
This method is perfect for beginners, children helpers, or when time is short, using soft caramel squares for guaranteed success.
Ingredients:
· 3 cups pecan halves, toasted
· 1 (11 oz) bag soft caramel squares (like Kraft), unwrapped
· 1 tablespoon heavy cream or milk
· 12 oz chocolate chips
· 1 tbsp coconut oil
Instructions:
Prep Clusters: As above, create pecan clusters on parchment-lined sheets.
Make Soft Caramel: In a microwave-safe bowl, combine caramels and cream. Microwave on high in 60-second intervals, stirring well between each, until completely smooth (about 2-3 minutes total).
Assemble: Spoon a small pool of soft caramel onto each cluster. Let set until firm (you can speed this up in the fridge for 10 minutes).
Chocolate Coat: Melt chocolate and coconut oil together until smooth. Dip or drizzle over each set turtle. Let set.
Chef’s Pro-Tips for Turtle Mastery
· The Nut: Pecans are non-negotiable for authenticity, but walnuts or macadamias make delicious variations. Toasting is the single biggest flavor upgrade you can make.
· Caramel Consistency: For the classic version, the exact temperature is key. 245°F gives a perfect chew. At 250°F, it will be harder; at 240°F, softer.
· Preventing Stickiness: If your caramel is too soft at room temperature, it may be humid or slightly undercooked. Dusting the finished turtles lightly with cocoa powder can help, but storing them in a single layer with parchment between layers is best.
· Chocolate Choices: Use a chocolate you love to eat. A blend of semi-sweet and dark is classic. For gifting, a drizzle of white chocolate over the top makes them stunning.
· The Salt Factor: The sprinkle of flaky sea salt is not just trendy—it’s essential. It cuts the sweetness and elevates every flavor.
Packaging & Gifting: How to Share Your Creations
Turtles are perhaps the most giftable candy. Place them in mini paper candy cups and arrange in a decorative tin or a clear cellophane bag tied with a ribbon. For a personal touch, create a label: “Handmade Turtle Candies.” They ship remarkably well if packed carefully in a single layer with cushioning.
Storing Your Homemade Turtles
Store in an airtight container at cool room temperature for up to 2 weeks. They can be refrigerated for up to 3 weeks, but bring to room temperature to serve for the best texture and flavor. They can also be frozen for up to 3 months; thaw overnight in the refrigerator.
Frequently Asked Questions (FAQ)
Q: Can I use milk chocolate?
A:Absolutely. The classic is dark/semi-sweet, but milk chocolate is a beloved favorite. Its sweetness pairs wonderfully with the salty caramel.
Q: Why did my caramel turn grainy?
A:Graininess occurs if sugar crystals form on the side of the pot and fall in. To prevent this, brush down the sides of the pot with a wet pastry brush in the early stages of cooking, and avoid stirring once it comes to a boil unless the recipe specifies.
Q: Can I make these vegan?
A:Yes! Use vegan butter, coconut condensed milk, and vegan chocolate. For the quick method, seek out vegan caramel squares or make a date-based caramel.
Q: My chocolate got streaky after dipping.
A:This is “bloom,” caused by temperature changes. It’s still safe to eat but less pretty. Proper tempering (Method 1) or using coating chocolate (like Candiquik) prevents this.
Q: How do I get a perfect drizzle?
A:For artistic drizzles instead of full dips, place melted chocolate in a small zip-top bag, snip a tiny corner, and zig-zag over the turtles.
The Final Piece: A Timeless Treat, Made by You
Making turtle candy is an act of sweet craftsmanship. It connects you to a century of confectioners and home cooks who have found joy in creating these little clusters of delight. The process is as rewarding as the result—the smell of toasting pecans, the slow transformation of sugar into amber caramel, the glossy sheen of tempered chocolate.
Whether you choose the classic stovetop method or the easy cheater’s version, you are creating more than candy. You’re creating edible heirlooms, gifts of time and love, and a little taste of nostalgia that is, quite simply, irresistible.
Now it’s your turn to create a batch of bliss! Do you have a family turtle-making tradition or a secret twist on the recipe? Share your stories and tips in the comments below!
P.S. Know a fellow candy lover or someone who deserves a sweet homemade gift? Share this recipe with them! And for more classic, from-scratch confectionery recipes, subscribe to get our latest guides delivered straight to your inbox. Happy candy making!
More Recipes You Might Like
-

Cheesy Potato Patties 😋 – Crispy, Golden, and Irresistibly Cheesy If you’re looking for a high-RPM comfort food recipe that gets clicks, saves, and repeat cooks, Cheesy Potato Patties are a guaranteed winner. Crispy on the outside, soft and fluffy on the inside, and loaded with melty cheese—this recipe checks every box readers love: easy…
-

Brown Sugar Pineapple Ham Bake 😋 – The Ultimate Sweet & Savory Comfort Dish If you’re searching for a high-RPM, comfort-food recipe that people love clicking, saving, and cooking again and again, this Brown Sugar Pineapple Ham Bake is it. Sweet, sticky brown sugar. Juicy pineapple. Tender, savory ham. Baked together into one irresistible dish…
-

Angel Chicken Pasta – The Creamy Comfort Food That Everyone Loves
Few dishes feel as comforting, indulgent, and crowd-pleasing as Angel Chicken Pasta. This creamy, slow-cooked chicken pasta recipe has earned its name because it’s truly heavenly—rich, velvety sauce, tender chicken, and perfectly cooked pasta all coming together in one unforgettable meal. Angel Chicken Pasta is one of those recipes that never goes out of style.…