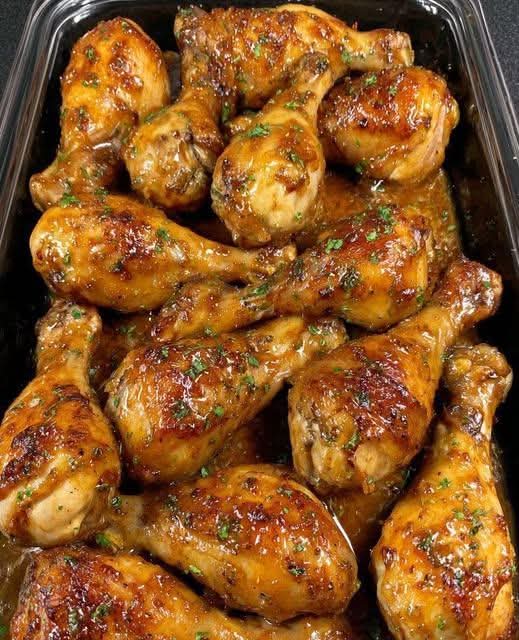
Let’s talk about a universal truth: nothing brings a family to the table faster than the smell of roasting chicken, especially when that smell is laced with the sweet, savory, and unmistakably irresistible aroma of honey and garlic. But here’s the real magic: achieving that perfect, sticky honey garlic glaze and crispy baked chicken doesn’t require a deep fryer or a chef’s pedigree. It requires one sheet pan, a handful of pantry staples, and this foolproof recipe.
These Honey Garlic Baked Chicken Drumsticks are the holy grail of easy weeknight dinners. They are family-friendly, absurdly simple to make, and deliver a restaurant-quality experience with minimal cleanup. They’re the perfect crossroad where healthy-ish recipes (hello, baking!) meet indulgent comfort food (hello, that glaze!). In this ultimate guide, we’ll unlock the secrets to getting the skin crackling-crisp, the glaze perfectly balanced, and the meat juicy every single time. Prepare to make a dinner that gets requested on repeat.
Why This Recipe is a Weeknight Game-Changer
Beyond the glorious flavor, this recipe solves the universal dinnertime dilemmas:
· Minimal Hands-On Time: 10 minutes of active prep. The oven does the heavy lifting.
· Budget-Friendly Protein: Drumsticks are one of the most affordable cuts of chicken, making this a cheap family meal.
· Meal Prep & Freezer Hero: They reheat beautifully and the marinade doubles as a freezer-friendly sauce base.
· Crowd-Pleasing Versatility: Equally at home on a busy weeknight as it is at a casual weekend gathering or game day spread.
· The Texture Triumph: We use a simple, science-backed trick (baking powder!) to ensure the skin bakes up shatteringly crisp, defying every expectation of “baked chicken.”
The Anatomy of a Perfect Honey Garlic Drumstick
A truly great drumstick has three non-negotiable attributes:
Juicy, Flavorful Meat: Achieved through a simple marinade and correct baking temperature.
Caramelized, Sticky-Sweet Glaze: That clings to the skin without being cloying, thanks to the savory balance of garlic and soy.
CRISPY Skin: The crown jewel. The textural contrast is what makes this dish sublime.
Your Simple Ingredient Lineup & The “Why”
This recipe is a testament to the power of pantry staples. Here’s what you need and the role each plays:
For the Chicken & Crispy Skin:
· Chicken Drumsticks (about 3 lbs): The star. Their higher skin-to-meat ratio is perfect for getting crispy. Pat them bone-dry with paper towels—this is the #1 step for crispiness.
· Baking Powder (1 tsp): THE SECRET WEAPON. Not baking soda. A light dusting of baking powder draws moisture to the surface and alters the skin’s pH, helping it blister and crisp phenomenally in the dry oven heat. You won’t taste it.
· Salt & Black Pepper: The essential foundation of flavor.
For the Legendary Honey Garlic Glaze:
· Honey (1/3 cup): For sweetness, stickiness, and that beautiful caramelization. Use a good-quality honey for the best flavor.
· Soy Sauce (1/4 cup, low-sodium preferred): Provides salty, umami depth. Use tamari for a gluten-free version.
· Fresh Garlic (4-5 cloves, minced): Non-negotiable. Fresh is best here for pungent, aromatic flavor.
· Rice Vinegar or Apple Cider Vinegar (1 Tbsp): The crucial acid that balances the sweetness and adds brightness.
· Fresh Ginger (1 Tbsp, grated): Honey and garlic’s best friend. Adds a warm, zesty note.
· Sesame Oil (1 tsp): A tiny amount adds a big, nutty aroma.
· Optional Thickener: A slurry of 1 tsp cornstarch + 1 Tbsp water if you prefer a thicker, glossier sauce.
For Garnish:
· Toasted sesame seeds and sliced green onions. They add color, texture, and a final fresh bite.
Step-by-Step Guide to Crispy, Sticky Perfection
Total Time: 50 minutes (10 mins prep, 40 mins bake) | Serves: 4-6
Step 1: The Crispy Skin Prep (The Most Important Step)
Preheat your oven to 400°F (200°C). Position a rack in the middle.
Place a wire cooling rack inside a large,rimmed baking sheet. This elevates the chicken, allowing hot air to circulate for all-around crispiness. Lightly coat the rack with cooking spray.
Thoroughly pat every drumstick drywith paper towels. In a small bowl, mix 1 tsp baking powder with 1 tsp salt and ½ tsp black pepper. Sprinkle this mixture evenly over the drumsticks, rubbing it lightly over the skin.
Step 2: The Initial Bake (Crisp the Skin)
Arrange the drumsticks on the prepared wire rack, leaving space between them.
Bake for 25-30 minutes.This high-heat blast will start rendering the fat and crisping the skin beautifully.
Step 3: Make the Magic Glaze
While the chicken bakes, combine the honey, soy sauce, minced garlic, grated ginger, vinegar, and sesame oil in a small saucepan. Whisk over medium-low heat until warm, combined, and slightly thickened, about 3-5 minutes. If using the cornstarch slurry, add it in the last minute and whisk until glossy. Set aside.
Step 4: Glaze & Caramelize
After the initial 25-30 minutes, remove the baking sheet from the oven. Carefully brush each drumstick generously with the honey garlic glaze.
Return the pan to the oven and bake for another 10 minutes.
Remove,brush again with another coat of glaze, and bake for a final 5-10 minutes, until the chicken is deeply glazed, caramelized in spots, and the internal temperature reaches 175°F (80°C) at the thickest part (drumsticks are best juiciest at this slightly higher temp).
Step 5: The Final Touch & Rest
Once out of the oven, let the drumsticks rest on the pan for 5 minutes. This allows the juices to redistribute.
Give them a final brush with any remaining glaze,then sprinkle lavishly with toasted sesame seeds and sliced green onions.
5 Pro-Tips for Absolute Mastery
Dry is Key: Moisture is the enemy of crisp skin. Pat, pat, pat those drumsticks until they feel completely dry to the touch.
The Wire Rack is Non-Negotiable: Baking directly on a sheet pan steams the bottom skin. The rack is essential for 360-degree crispness.
Don’t Marinate with the Glaze: The glaze contains sugar (honey) which will burn if applied too early. We bake the chicken first, then add the glaze for the final caramelization.
Use an Instant-Read Thermometer: For perfect doneness every time, take the guesswork out. Target 175°F for drumsticks.
Double the Glaze: If you’re a sauce person, double the glaze recipe. Simmer half to brush on while baking, and reserve the other half to warm and serve on the side for dipping.
Delicious Variations to Keep It Exciting
This easy chicken dinner is a perfect blueprint. Make it your own:
· Spicy Honey Garlic: Add 1-2 tsp of Sriracha or ½ tsp of red pepper flakes to the glaze.
· Lemon Herb Twist: Add the zest and juice of one lemon to the glaze and throw a few sprigs of fresh thyme on the baking sheet.
· Sticky Orange Ginger: Substitute half the honey with orange marmalade and add an extra tablespoon of fresh ginger.
· BBQ Hybrid: Mix 2 tbsp of your favorite BBQ sauce into the honey garlic glaze for a smoky twist.
· Meal Prep Power: Bake a double batch. Let cool, then store in airtight containers for up to 4 days. Reheat in the air fryer or a hot oven to restore crispiness.
What to Serve With Your Sticky Drumsticks
This is a versatile main dish. Pair it with:
· For a Light Meal: A simple cucumber salad or steamed broccoli.
· For Comfort: Fluffy white rice or mashed potatoes to soak up the extra glaze.
· For Something Different: Coconut rice or fried cauliflower rice.
· The Classic Combo: Roasted carrots and green beans on the same sheet pan (add them halfway through).
FAQ: Your Honey Garlic Chicken Questions, Answered
Q: Can I use chicken thighs or wings?
A:Absolutely! For bone-in, skin-on thighs, follow the same method (temp to 185°F). For wings, separate drums and flats, reduce initial bake time to 20 mins before glazing.
Q: My glaze burned on the chicken. What happened?
A:The oven rack was likely too high, or the glaze was applied too early. Ensure the rack is in the middle position and only glaze in the last 15 minutes of cooking.
Q: Can I make this in an air fryer?
A:Yes! It’s fantastic. Pat dry and toss with baking powder mix. Air fry at 400°F for 10 mins. Brush with glaze, air fry 5 mins. Repeat glazing once more for 3-5 mins until sticky and cooked through.
Q: How do I store and reheat leftovers?
A:Store in an airtight container in the fridge for 3-4 days. Reheat in an air fryer at 375°F for 4-5 minutes or on a baking sheet in a 400°F oven for 10 minutes to re-crisp. The microwave will make the skin soft.
Q: Is this recipe gluten-free?
A:Easily! Ensure you use tamari or a certified gluten-free soy sauce.
The Final Verdict: Why This Recipe Wins Dinner
Honey Garlic Baked Chicken Drumsticks are more than just a recipe; they are a reliable dinner strategy. They deliver the kind of finger-licking, satisfying flavor that feels like a treat, with the simplicity and affordability of a weekday staple. They prove that you don’t need complicated techniques or obscure ingredients to put a spectacular, crowd-pleasing meal on the table.
So, grab that sheet pan, pat those drumsticks dry, and get ready for a standing ovation from your dinner table. This is the easy, healthy-ish, and insanely delicious chicken recipe you’ve been searching for.
Recipe Card: Crispy Honey Garlic Baked Chicken Drumsticks
Yield: 4-6 servings
Prep Time:10 minutes
Cook Time:40-45 minutes
Total Time:50-55 minutes
Category:Main Course
Method:Baking
Cuisine:American-Asian Fusion
Ingredients
For the Chicken:
· 3 lbs chicken drumsticks (about 8-10)
· 1 tsp baking powder
· 1 tsp kosher salt
· ½ tsp black pepper
For the Honey Garlic Glaze:
· ⅓ cup honey
· ¼ cup low-sodium soy sauce (or tamari)
· 4-5 cloves garlic, minced
· 1 Tbsp fresh ginger, grated
· 1 Tbsp rice vinegar or apple cider vinegar
· 1 tsp sesame oil
· (Optional: 1 tsp cornstarch + 1 Tbsp water)
For Garnish:
· 2 green onions, thinly sliced
· 1 tsp toasted sesame seeds
Instructions
- Prep: Preheat oven to 400°F (200°C). Line a rimmed baking sheet with foil and fit with a wire rack. Spray rack lightly.
- Dry & Season: Pat drumsticks very dry. Mix baking powder, salt, and pepper. Sprinkle evenly over drumsticks.
- Bake: Place drumsticks on rack. Bake for 25-30 mins.
- Make Glaze: While chicken bakes, combine all glaze ingredients (except cornstarch slurry) in saucepan. Simmer 3-5 mins until slightly thickened. For thicker glaze, mix cornstarch and water, whisk into sauce until glossy.
- Glaze: Remove chicken. Brush generously with glaze. Return to oven for 10 mins. Brush again, bake 5-10 mins more until internal temp reaches 175°F and skin is crispy.
- Serve: Rest 5 mins. Garnish with green onions and sesame seeds. Serve immediately.
Notes: For ultimate crispiness, do not skip drying the chicken or using the wire rack/baking powder method. Double the glaze if you love extra sauce. Leftovers reheat best in an air fryer or conventional oven. For a gluten-free version, use tamari.
More Recipes You Might Like
-

Cheesy Potato Patties 😋 – Crispy, Golden, and Irresistibly Cheesy If you’re looking for a high-RPM comfort food recipe that gets clicks, saves, and repeat cooks, Cheesy Potato Patties are a guaranteed winner. Crispy on the outside, soft and fluffy on the inside, and loaded with melty cheese—this recipe checks every box readers love: easy…
-

Brown Sugar Pineapple Ham Bake 😋 – The Ultimate Sweet & Savory Comfort Dish If you’re searching for a high-RPM, comfort-food recipe that people love clicking, saving, and cooking again and again, this Brown Sugar Pineapple Ham Bake is it. Sweet, sticky brown sugar. Juicy pineapple. Tender, savory ham. Baked together into one irresistible dish…
-

Angel Chicken Pasta – The Creamy Comfort Food That Everyone Loves
Few dishes feel as comforting, indulgent, and crowd-pleasing as Angel Chicken Pasta. This creamy, slow-cooked chicken pasta recipe has earned its name because it’s truly heavenly—rich, velvety sauce, tender chicken, and perfectly cooked pasta all coming together in one unforgettable meal. Angel Chicken Pasta is one of those recipes that never goes out of style.…