There’s a special kind of magic in a perfectly crafted caramel slice. That crunchy biscuit base, the layer of luxuriously soft, buttery caramel, and the glossy cloak of rich chocolate—it’s a symphony of textures and flavors in every bite. Yet, for years, I was intimidated. I thought this iconic treat, also known as Millionaire’s Shortbread, was reserved for fancy bakeries. That was until I discovered this shockingly easy caramel slice recipe that requires no baking and delivers professional results every single time.
Whether you call it caramel slice, caramel shortbread, or millionaire’s shortbread, this dessert is a universal crowd-pleaser. It’s the perfect make-ahead dessert for potlucks, the star of any holiday baking platter, and an undeniable favorite for easy entertaining. In this comprehensive guide, I’m sharing not only the foolproof recipe but all the tips, tricks, and simple variations (including gluten-free and vegan options) to make it your own. Get ready to make the best caramel slice of your life!
Why This Is the Best Caramel Slice Recipe You’ll Ever Try
Before we dive into the ingredients, let me tell you why this recipe stands out. First, it’s incredibly easy. We bypass the finicky process of making caramel from scratch on the stove by using a brilliant, fail-safe condensed milk method. This makes it a fantastic no-bake dessert perfect for beginners or when you don’t want to turn on the oven.
Second, the texture is absolute perfection. The base is densely crunchy, the caramel is firm yet chewy and soft, and the chocolate cracks beautifully on top. It’s a masterclass in contrast. Finally, this recipe is incredibly customizable. Once you master the basic formula, the flavor world is your oyster. We’ll explore delicious variations later on.
Understanding the Three Layers of Perfection
A great caramel slice is all about balance. Let’s break down the anatomy of this perfect family-friendly dessert:
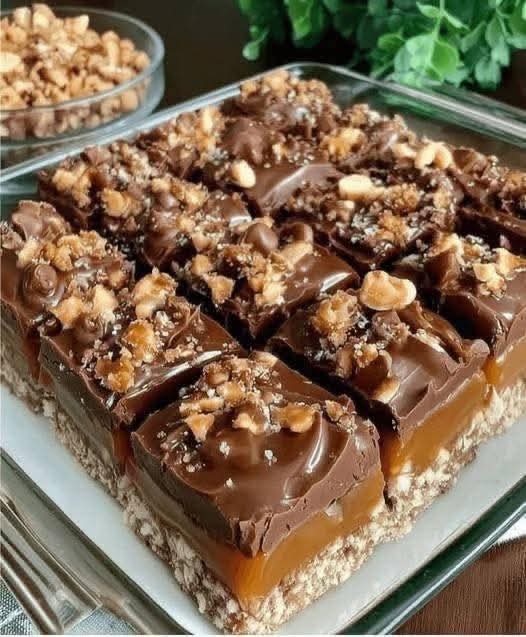
The Base: A sturdy, sweet, and salty foundation made from crushed biscuits (cookies) and melted butter. It provides the essential crunch.
The Caramel Filling: The star of the show. A rich, buttery, deeply flavorful layer that is soft and chewy, not hard or overly sticky.
The Chocolate Topping: A smooth, snappy layer of chocolate that seals in the caramel and adds a final note of luxury.
Key Ingredients & Simple Swaps
The beauty of this easy caramel slice lies in its simple ingredient list. Here’s what you’ll need and why each component matters:
For the Biscuit Base:
· Digestive Biscuits/Graham Crackers (200g): These plain, slightly sweet, and whole-wheat biscuits provide the ideal neutral, crunchy base. Their texture holds up perfectly against the caramel.
· Gluten-Free Swap: Use any gluten-free digestive biscuits or plain gluten-free cookies.
· Flavor Twist: For a deeper flavor, try using ginger snaps or even crushed shortbread cookies.
· Unsalted Butter (100g), Melted: The binder that holds the base together and adds a lovely rich flavor. Using unsalted allows you to control the salt level.
For the Legendary Caramel Filling:
· Unsalted Butter (100g): Provides the luxurious, mouth-coating richness.
· Golden Syrup or Light Corn Syrup (3 Tbsp): This is the secret weapon! It prevents the caramel from crystallizing, ensuring a smooth, glossy, and perfectly chewy texture every time.
· Sweetened Condensed Milk (1 can, 395g): The cornerstone of our no-bake caramel. When heated with butter and sugar, it transforms into the most incredible, easy caramel.
· Soft Brown Sugar (100g): Using brown sugar (instead of white) gives the caramel its classic, deep, toffee-like flavor and beautiful color.
· A Pinch of Sea Salt: Absolutely crucial. It balances the intense sweetness and makes all the flavors pop. Don’t skip it!
For the Chocolate Topping:
· Dark or Milk Chocolate (200g): You can use baking chocolate or good-quality chocolate bars. Dark chocolate (around 70%) offers a sophisticated, bittersweet contrast. Milk chocolate is a sweeter, more classic choice loved by kids.
· Dairy-Free/Vegan Swap: Use a high-quality dairy-free chocolate.
· A small knob of Butter (1 tsp): Added to the melting chocolate to give it a slight sheen and a smoother, more pliable texture for cutting.
Equipment You’ll Need:
· A 20cm (8-inch) square baking tin
· Baking parchment paper
· Food processor or a zip-lock bag and rolling pin
· Medium and large saucepans
· Heatproof spatula or wooden spoon
How to Make Caramel Slice: The Foolproof Step-by-Step Guide
Follow these steps carefully for flawless, sliceable results every time.
Step 1: Prepare the Tin & Crush the Biscuits
Line your square tin with parchment paper, leaving some overhang on two sides. This creates “handles” that will make lifting the entire slice out later a breeze.
Place the biscuits in a food processor and pulse until they resemble fine sand. No food processor? No problem! Place them in a sturdy zip-lock bag, seal it, and crush them with a rolling pin until finely ground.
Step 2: Create the Crunchy Base
In a medium bowl, combine the finely crushed biscuits with the 100g of melted butter. Mix thoroughly until every crumb is evenly coated and the mixture looks like wet sand.
Tip this mixture into your prepared tin. Using the back of a spoon or the base of a flat glass, press it down very firmly and evenly. This compacting is critical—a firm base won’t crumble when sliced. Place the tin in the refrigerator to set while you make the caramel.
Step 3: Craft the Perfect No-Bake Caramel
This is the step where magic happens. In a medium-sized, heavy-bottomed saucepan, combine the butter, brown sugar, golden syrup, and sweetened condensed milk.
Place the pan over low to medium heat. Stir continuously with a heatproof spatula or wooden spoon until the butter has melted and the sugar has completely dissolved. This is important to avoid graininess.
Once smooth, increase the heat to a gentle simmer. Continue to stir constantly for about 7-10 minutes. The mixture will thicken, darken in color, and become fragrant. You’ll know it’s ready when it leaves a thick coating on the back of your spoon and pulling the spoon across the bottom of the pan leaves a clear path that takes a second to fill in (this is called the “soft-ball stage” in candy-making).
Pro Tip: Do not walk away and do not stop stirring! Constant stirring and a watchful eye prevent the caramel from sticking and burning on the bottom.
Step 4: Assemble the Caramel Layer
Remove the caramel from the heat immediately and stir in that vital pinch of sea salt.
Take the chilled base from the fridge and pour the hot caramel over it. Working quickly but carefully, tilt the tin to spread the caramel into an even layer.
Tap the tin gently on the counter to release any air bubbles. Allow the caramel slice to cool at room temperature for about 30 minutes, then transfer it to the refrigerator. Let it chill for at least 2-3 hours, or ideally overnight. The caramel needs this time to set firmly.
Step 5: The Final Chocolate Coat
Once the caramel layer is completely firm to the touch, it’s time for the chocolate.
Chop your chocolate into small, even pieces for even melting. Combine it with the teaspoon of butter in a heatproof bowl. Melt gently using a double boiler (a bowl set over a pan of simmering water, ensuring the bowl doesn’t touch the water) or in short bursts in the microwave, stirring between each burst until smooth.
Pour the melted chocolate over the completely set caramel layer. Tilt the tin again to create a smooth, even, and luxurious chocolate topping.
Step 6: The Secret to Perfect Slices
Here’s the final, critical tip for that clean, professional look. Do not let the chocolate set completely hard before scoring.
Let the chocolate sit at room temperature for 5-10 minutes until it is just beginning to set—it will lose its high-gloss shine. Then, using a sharp, thin-bladed knife that has been warmed under hot water and dried, gently score the chocolate into your desired slice sizes (don’t cut all the way through). This prevents the chocolate from shattering later.
Place the tin back in the refrigerator for another 30-60 minutes until the chocolate is fully set. Finally, use the parchment paper handles to lift the whole block out onto a cutting board. Using the same warmed knife, cut fully through your pre-scored lines. For super-clean slices, wipe the knife clean between each cut.
Expert Tips & Flawless Variations
This easy caramel slice recipe is wonderfully adaptable. Here are some popular variations to try:
· Salted Caramel Slice: After spreading the melted chocolate, sprinkle the top lightly with flaky sea salt (like Maldon) before it sets.
· Gluten-Free Caramel Slice: As mentioned, simply use your favorite gluten-free biscuits for the base. All other ingredients are naturally gluten-free.
· Vegan Caramel Slice: This is easier than you think!
· Use vegan biscuits (like Hobnobs or specific GF/vegan brands).
· For the caramel, use vegan butter and a can of coconut condensed milk (available at most health food stores).
· Top with a high-quality dairy-free chocolate.
· Chocolate Orange Twist: Add the zest of one orange to the biscuit base. For an extra punch, add a teaspoon of orange extract to the caramel layer.
· Nutty Delight: Press 50g of chopped toasted pecans or hazelnuts into the caramel layer just after pouring it, before it sets.
· Coffee Caramel Slice: Dissolve 1-2 teaspoons of instant espresso powder into the caramel mixture for a beautiful mocha flavor.
FAQs: Your Caramel Slice Questions, Answered
Q: Why is my caramel too soft/runny?
A:This usually means it wasn’t simmered for long enough. Ensure you cook it until it visibly thickens and leaves a clear path on the bottom of the pan. Chilling time is also crucial—don’t rush it.
Q: Why did my caramel turn out grainy?
A:Graininess is caused by sugar crystals. To prevent this, ensure the sugar is fully dissolved in the gentle melting stage before you bring it to a simmer. Stirring constantly during cooking also helps.
Q: Can I freeze caramel slice?
A:Absolutely! This is a fantastic make-ahead dessert. Freeze the whole block or individual slices in an airtight container for up to 3 months. Thaw in the refrigerator overnight.
Q: How long does homemade caramel slice last?
A:Stored in an airtight container in the refrigerator, it keeps beautifully for 7-10 days. The flavors actually improve after a day or two.
Q: My chocolate topping cracked when I cut it. What went wrong?
A:This is almost always due to the chocolate being too cold and hard. The scoring trick while it’s semi-set and using a hot knife are the solutions!
How to Store, Gift, and Serve Your Masterpiece
Storage: Always store your caramel slice in the refrigerator. The cold keeps the caramel firm and the chocolate snappy. Layer slices between parchment paper in an airtight container.
Gifting: These slices make a wonderful homemade gift. Place them in a decorative box or tin lined with parchment paper. They are a stunning addition to any holiday baking gift basket.
Serving: For the best experience, let the slices sit at room temperature for 10-15 minutes before serving. This slightly softens the caramel, making it beautifully chewy and releasing the full aroma of the butter and toffee flavors.
Final Thoughts
This caramel slice recipe is more than just a set of instructions—it’s a gateway to creating moments of pure joy. It’s the satisfaction of creating something stunningly delicious with your own hands, the happy silence that falls over a table when you serve it, and the pride of mastering a classic.
It proves that you don’t need to be a professional pastry chef to create decadent desserts that wow a crowd. With this no-bake, easy caramel slice in your repertoire, you’re always ready for any occasion, from a last-minute need for a quick dessert to a planned holiday baking extravaganza.
So, gather those simple ingredients and treat yourself and your loved ones to this timeless, irresistible delight. Happy slicing!
Recipe Card: The Ultimate No-Bake Caramel Slice
Yield: 16 generous slices
Prep Time:30 minutes
Chill Time:4+ hours (overnight best)
Total Time:4 hours 30 minutes
Category:Dessert
Method:No-Bake
Cuisine:International
Ingredients
For the Base:
· 200g Digestive Biscuits or Graham Crackers
· 100g Unsalted Butter, melted
For the Caramel Filling:
· 100g Unsalted Butter
· 3 Tbsp Golden Syrup or Light Corn Syrup
· 1 can (395g) Sweetened Condensed Milk
· 100g Soft Brown Sugar
· 1 generous pinch Sea Salt
For the Chocolate Topping:
· 200g Dark or Milk Chocolate, chopped
· 1 tsp Unsalted Butter
Instructions
- Line & Crush: Line a 20cm (8-inch) square tin with parchment paper. Finely crush the biscuits in a food processor or zip-lock bag.
- Make Base: Mix crushed biscuits with 100g melted butter until combined. Press firmly and evenly into the prepared tin. Chill.
- Cook Caramel: In a medium heavy-bottomed saucepan, combine all caramel ingredients. Melt over low heat, stirring until sugar dissolves. Bring to a gentle simmer and cook for 7-10 minutes, stirring constantly, until thickened and golden.
- Assemble: Remove caramel from heat, stir in salt. Pour over the chilled base and spread evenly. Tap to remove bubbles. Cool for 30 mins, then refrigerate for 2-3 hours until firm.
- Add Chocolate: Melt chocolate with 1 tsp butter until smooth. Pour over the set caramel and tilt to coat evenly.
- Score & Set: Let chocolate sit for 5-10 mins until beginning to set. Score into slices with a warm knife. Return to fridge for 30-60 mins to fully set.
- Slice & Serve: Use parchment to lift out the block. Cut fully through scored lines with a warm knife. Store in an airtight container in the refrigerator.
Notes: For clean slices, always use a hot, dry knife and wipe it clean between cuts. For a vegan version, use vegan biscuits, butter, coconut condensed milk, and dairy-free chocolate.
More Recipes You Might Like
-

Cheesy Potato Patties 😋 – Crispy, Golden, and Irresistibly Cheesy If you’re looking for a high-RPM comfort food recipe that gets clicks, saves, and repeat cooks, Cheesy Potato Patties are a guaranteed winner. Crispy on the outside, soft and fluffy on the inside, and loaded with melty cheese—this recipe checks every box readers love: easy…
-

Brown Sugar Pineapple Ham Bake 😋 – The Ultimate Sweet & Savory Comfort Dish If you’re searching for a high-RPM, comfort-food recipe that people love clicking, saving, and cooking again and again, this Brown Sugar Pineapple Ham Bake is it. Sweet, sticky brown sugar. Juicy pineapple. Tender, savory ham. Baked together into one irresistible dish…
-

Angel Chicken Pasta – The Creamy Comfort Food That Everyone Loves
Few dishes feel as comforting, indulgent, and crowd-pleasing as Angel Chicken Pasta. This creamy, slow-cooked chicken pasta recipe has earned its name because it’s truly heavenly—rich, velvety sauce, tender chicken, and perfectly cooked pasta all coming together in one unforgettable meal. Angel Chicken Pasta is one of those recipes that never goes out of style.…